Knee pain at the iliotibial band: What can you do about it?

Description: Iliotibial band syndrome, or ITBS, is one of the more common injuries affecting runners. And why is that? Probably because the same faulty motor patterns and muscle weaknesses tend to run rampant amongst many runners. ITBS tends to come on gradually, causing a lateral knee pain, though some runners are able to bring on the pain in a single run of greater distance or intensity than their typical. It is often another story of too much, too fast.

Anatomy: The muscles that attach to the ITB are from the hip and thigh region: gluteus maximus, vastus lateralis and tensor fascia latae. The far end of the ITB splits into several sections, which indicates it has a role in the function of many areas. Most commonly athletes will complain of pain where the ITB interacts closely with the lateral femoral condyle.

Cause: The primary function of the ITB is to stabilize the knee during walking and running gait. When some of the hip muscles are weak, the ITB can be relied upon too heavily for knee stability, thus stressing its lower attachment excessively.

Signs and symptoms: The far end of the ITB can flare up like a tendonitis does when initially becoming inflamed. There can be inflammation at the bursa that sits beneath the ITB as well. As a result, you might notice swelling and tenderness to touch at the outer knee where the ITB crosses. There can be a snapping or popping sensation at the lateral knee. The pain tends to take on a sharp and stabbing quality when there is demand placed on the leg but the general area may be achy after use. 

A common finding in many instances of ITB syndrome is hip muscle weakness, particularly of the gluteus medius and gluteus maximus muscles. There may be a decreased ability of the nervous system to activate and control those hip muscles while running, even if they are strong in testing.

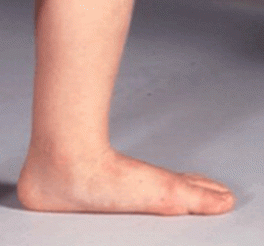
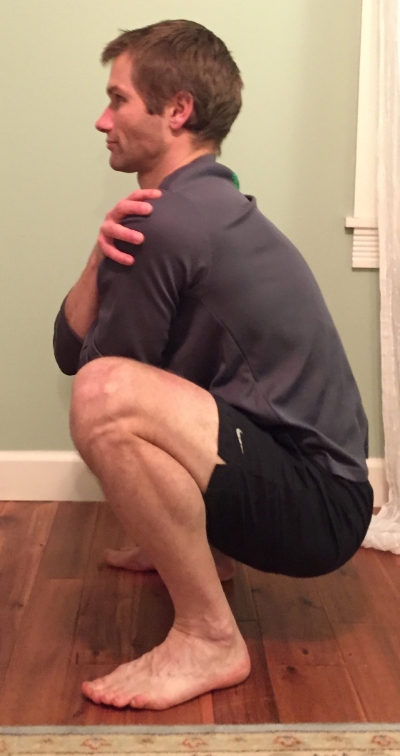
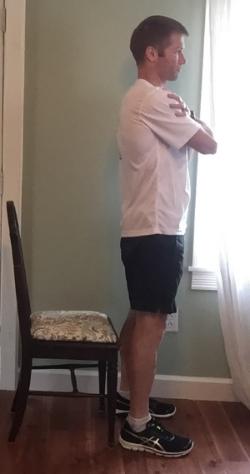
An indicator of poor gluteus medius activation is an excessive dropping of the opposite side of the pelvis when the affected leg is in stance. One way you can check this is to stand in front of a mirror, hands on your hips, and then shifting yourself onto one leg. For instance, if you move onto the left leg and the right side of the pelvis clearly drops then you have a positive Trendelenburg's sign. Check both sides as it is common to have an asymmetry. In the video below I demonstrate both the active position and inactive position. The same excess of pelvic motion can occur in walking and running. 

Solutions: As with many of these injuries, there is no magic pill and no quick fix. Consistent but brief supplemental work is the reliable solution.

1. Some physicians may promote injecting the bursa region that lies between the femur and the end of the ITB. Corticosteroid injection should be a last resort as recurrence is very likely if the mechanical control of the hip and knee are not addressed. I have had patients where injection was used as a first line treatment. Guess what? The pain came back. At least this is a lower risk area to inject with corticosteroid as the risk of ITB rupture is minimal compared to an area like the Achilles tendon or posterior tibialis tendon. The side of the quadriceps is probably more likely to rupture. Remember, injections do not address the mechanical reasons the injury occurred in the first place.

2. The very first and simplest issue to address is the presence of any weak muscles at the lateral side and back of the hip. These muscles need to be activated easily and consistently by the nervous system. So many people have weak muscles around their hips, trunk, and pelvis so don't assume you are an exception. It is a daily occurrence for me to see these issues in the clinic. 

Athletes need a baseline level of strength and the ability to effectively recruit these muscles while running to prevent the pelvis and hips from destabilizing. Poor strength or activation may allow the thigh to collapse inward or rotate inward along with an unleveling of the pelvis. It’s also important to consider the endurance of these muscles because the strength will undoubtedly be decreased a few miles into a run or fatiguing workout.

As a side note, I have seen so many patients that were correctly told to perform exercises like a side lying straight leg raise only to discover they are doing it in a manner that works the wrong muscles because no one checked their technique. Their form was incorrect and doing these exercises incorrectly can actually contribute to the problem. Not only are the wrong muscles used (eg. tensor fascia latae), they are creating a dominance in areas that further inhibit the function of the correct muscles (eg. gluteus maximus).

Here's the routine that I do on a weekly basis. 

3. As the awareness, endurance, and strength are all starting to increase, it is necessary to challenge the nervous system’s ability to stabilize the hips and pelvis. Single leg balancing activities are a great program component to do this. The individual must recognize where the pelvis achieves a stable position in order for this to be effective. This can progress to single leg hopping and jumping activities while keeping the pelvis stable.

4. There has been some controversy over whether athletes should foam roll their ITB, which I discussed previously here. Don’t bother trying to stretch your ITB unless you like to waste time and potentially worsen the problem. Most ITB stretches simply stretch the hip muscles that are already weak, which is absolutely counterproductive. And the ITB’s connective tissue is extraordinarily strong so you aren’t going to stretch it.

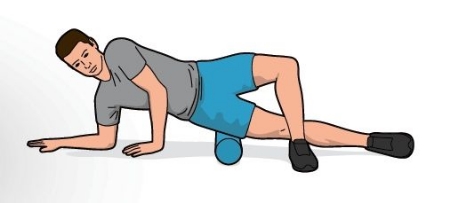
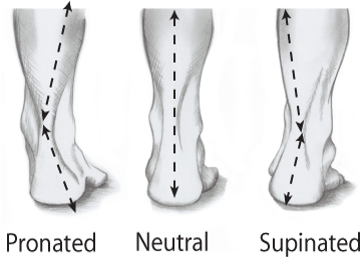
image courtesy 220triathlon.com

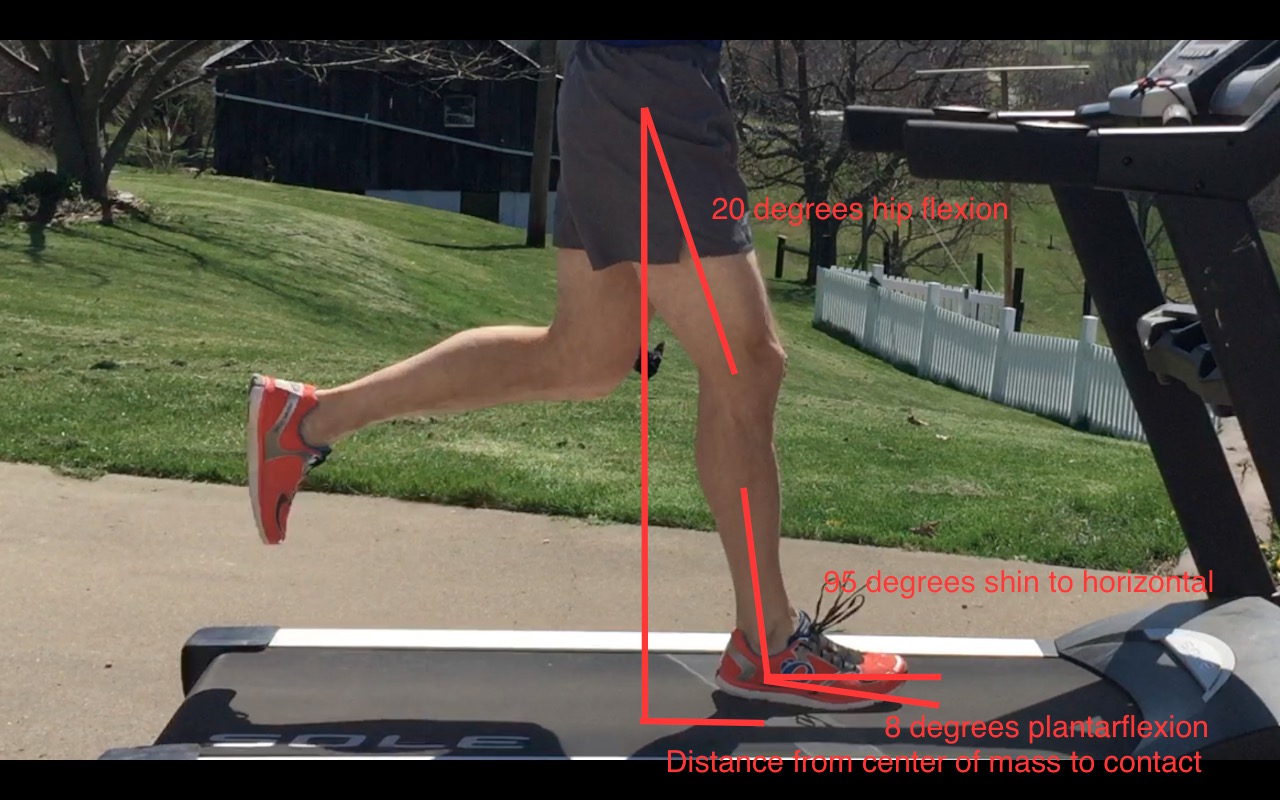
5. Running technique changes can be effective to normalize demands on the hip muscles and move in a less painful range of motion. The knee needs to maintain a high level of bend during swing. If you have a tendency to overstride far forward of the body’s center of mass then you will place greater demand on the gluteus medius muscle as soon as the foot makes contact, setting yourself up for failure. You may only need to increase your cadence 4-6 steps per minute and think of nothing else. There’s more information on cadence changes in my shin splint article here. The relationship of the ITB to the femur bone beneath it also changes as the knee is bent and straightened so changing the technique can change that relationship. In some runners there can be a benefit to running quickly for 20-30 seconds and then walking to vary the mechanical position of the ITB to the femur.

Poor right hip abductor engagement

6. If you have been unable to exercise secondary to ITB pain, make sure you take full recovery days between the days that you do start to exercise. These off days are great to emphasize the strengthening, balance, maintenance, and so on. For running that first time back, short and consistent is the name of the game. Better to run one mile each on three or four days than three to four miles at once. Depending on the number of days you have taken off, a mile isn’t an unreasonable distance to start at and that may also require a walk/run program. 

Please let me know if you have any questions at derek@mountainridgept.com. 

Highlands Sky 40 Mile Trail Run: Best Race for Anyone with Achy Feet

Super tame section of Canaan singletrack

The neverending boulder fields, rock-strewn trails, endless bogs, and cold stream crossings will provide your feet with the nice, soothing care that they deserve. I wish I lived closer to the course so I could run it after work on days when my feet are a little achy.

Seriously though, this is a brutal course, at least through the beginning miles. For those of you unfamiliar with the event, the point-to-point course traverses the Canaan Valley and Dolly Sods areas in the Monongahela National Forest.

Despite doing my homework by asking prior competitors about the terrain, stalking Strava segments, and searching YouTube, I could have known so much more about the course. There is no substitute for experience and having never done the event it’s hard to know what to expect. But that’s also part of what makes the challenge more exciting.

Pre-race

The pre-race dinner at Canaan Valley Resort was great. There was a nice variety of carb-heavy food and local craft beer from Mountain State Brewing. Several high quality door prizes were given away. I won coffee from Sweet Bloom Coffee Roasters and as of this morning I've decided it's the best coffee I've ever made at home. 

Most racers stay at the resort but I ended up staying at the Timberline Ski Resort, which I would see around mile 35 in the following day’s run. I awoke at 4:00 AM and began the typical race morning preparation with the special hotel rendition of my classic breakfast sandwich: 1 everything bagel, 4 slices of bacon, and 1 egg. After a banana for dessert I was on my way out the door.

Bacon makes you faster not fatter

Start

My wife and I drove down to the starting area in Laneville, WV, arriving around 5:30 AM. It was a little chilly for standing (because I’m a wuss), but perfect for running. The forecast was calling for very nice sunny and slightly warmer weather. Wish I could duplicate that for every race. I’d heard rumors that the top competitors started out hard and fast to avoid a bottleneck at the trailhead. That was definitely true, as I was running around 7 minutes per mile on the paved road until we hit the trail around mile two and there were runners in front of me going even faster.

Almost go time

We then began the long ascent from Laneville, WV up the mountain toward the Dolly Sods area. We made our way through multiple mountain stream crossings and large, unforgiving patches of stinging nettles. A pack of five guys formed in front of me going up that 6-mile climb, and the current leader was well off of the front. The pack of five eventually became a pack of three, as two dropped off behind me. I had to make the decision early to let them run away from me as I was pushing my heart rate well into heart rate zone 5 and I don’t even do that in the early miles of a road marathon!

Frolic in the ferns

After getting to aid station #2 one runner caught me and I dug deep to stay near to him as we descended into another large ravine. It’s not always the climbs that are hard on your legs. If it hadn’t hurt me so much I would have liked that descent more because it was laden with ferns.

Entering Dolly Sods

I did eventually catch that group and was able to stay in front of them for the entirety of the race. But in my efforts, I mistakenly pushed myself a bit too much, too early. The upper portion of the mountain became quite steep in places, enough to require use of the arms and hands to climb. I quickly learned that these were some of the most true and unforgiving mountain trails that I have ever raced. I came into the halfway point in second place, wondering how rough I was really going to feel by mile 30, knowing the early course had taken a toll. As an aside, I’m voting aid station #4 the best on the course for their high level of enthusiasm!

Multitasking food, shoes, and socks with fantastic volunteers

Friend Daniel Hanks shaving his legs at the halfway point

Road Across the Sky

Running the stretch of gravel road known as the Road Across the Sky, I could gradually feel my efforts catching up to me. It was difficult to run under 9 minutes per mile on a section where I should have been able to do 8 minutes easily. As a result, two runners caught me.

By the time mile 30 was approaching, I was definitely depleted more than I expected. Nothing like making a beginner mistake. I began hiking uphill sections where I would normally run.  

Those couple miles up to mile 33 were not fun, as the terrain was exposed to full sun and at over 5 hours into the event I was becoming emotionally and physically drained and that allowed yet another runner to catch me. Very demotivating. He was doing what I usually strive to do: negative split!

I felt like my nutritional intake was lagging behind and that contributed to my suffering. Speaking of nutrition, here’s what I ate and drank during the race:

  • 4 Gu gels
  • 1 peanut butter and jelly sandwich
  • 2.5 bananas, 2.5 liters of water
  • 3 oz. pickle juice, 3 dill pickle spears
  • 6 Oreo cookies
  • handful of plain M & Ms
  • handful of trail mix
  • 2 salted boiled potato slices
  • 12 oz. Coca Cola

Stupid knee

At mile 33 I started to have right lateral knee pain. I briefly forgot about it at aid station #7, but when I took off running again it reminded me of its presence less than 100 yards from the aid station. The intensity grew rapidly and substantially. I couldn’t even walk without pain and I was forced to limp. That was incredibly discouraging. I began to mentally prepare to walk the final 7 miles of the event, hoping to somehow hang on for a top 10 finish.

Butt Slide

But I actually didn’t have to walk that much as I began descending from the ridge. My inner Physical Therapist kicked in and told me to look for the fatigue-related running pattern changes. I noticed that I was disengaging my right quadriceps and allow my right knee to snap backward a little. The muscle just wanted to be lazy. And I know I have a history of landing with my right foot closer to centerline (i.e., crossing inward). I realized that if I just ran with the knee slightly more flexed and with a wider stance, the pain began to consistently subside.

All of my consistent strength training paid off because I had reliable quads on the steep downhill section affectionately known as “Butt Slide.” However, just out of the fear of pain returning I remained timid on the downhills and technical sections through mile 35. At one point the trail became less obvious I was wandering aimlessly for about a minute on that hillside. Trusting my directional instinct fortunately brought me back to the red flags on trail.

Road Race

I had recovered very well from the 2 miles of easier running. The flat gravel and paved road from that point on gave me hope that I could run quickly without tweaking my knee. As I approached the final aid station I could see one of the runners who had passed me on the Road Across the Sky. I downed 2 cups of Coca-Cola at aid station #8 and took off with a new motivation. It became a road race from mile 37 to 40. I managed to move up a place at the start of mile 38.

Finish

I ultimately finished up 4th overall, which makes me happy having never raced there before. That was definitely slower than where I wanted to be but the reasons were very clear to me. That course is a true challenge and quite beautiful. It would be great to run parts of it again while taking more time to stop and appreciate the surroundings. When trying to run hard there is so much time spent staring at the ground, hoping not to fall or twist an ankle. I will be back. 

Happy to be done and excited to have run the final 7 miles

Thanks

Special thanks to Dan Lehman, Adam Casseday and the rest of the WV Mountain Trail Runners crew for putting on such an awesome event, really caring about the racers, and giving out some cool prizes. And a big thanks to my wife for driving my tired butt home and crewing for me. And thanks to Pearl Izumi for the sponsorship this season. 

Should you exercise while taking antibiotics?

Did you know that there are some prescription drugs that can have a negative impact on exercise capacity, recovery, and injury?

As if most of us didn’t already dislike taking antibiotics, now you might want to think about the documented exercise-related side effects from a specific family of antibiotics known as fluoroquinolones. These drugs have been associated with a risk of tendon rupture and tendon overuse injury.

Fluoroquinolones are frequently used to treat sinus infections, bronchial infections, and urinary tract infections, and work well against a large variety of bacteria. Which means many of us have taken these drugs.

Examples of these drugs include:

  • Levaquin (levofloxacin)

  • Cipro (ciprofloxacin)

  • Avelox (moxifloxacin)

  • Floxin (ofloxacin)

  • Factive (gemifloxacin)

Despite the consistently positive effects, in May 2016 the FDA made this statement available: “An FDA safety review has shown that fluoroquinolones are associated with disabling and potentially permanent, serious side effects that can occur together.  These side effects can involve the tendons, muscles, joints, nerves and central nervous system. As a result, the FDA is also requiring label changes for all systemic fluoroquinolone antibacterial drugs to reflect this new safety information.”

The FDA is not suggesting that doctors should stop prescribing these drugs. They are suggesting that they should not always be the first line treatment.

These side effects have been researched since 1996 (and one source documented tendon damage from the use of one of these drugs in 1983). Often the individuals begin to have tendinitis-like symptoms that quickly progresses to partial or full tearing of the involved tendons. Achilles tendon damage has been particularly well documented with tendinitis and ruptures.

Does this mean you will definitely have a torn tendon after taking these antibiotics? No. But as an individual with a more active lifestyle that heavily stresses your connective tissues, you should be aware and concerned if you begin to have tendon pain while taking or shortly after taking a course of these drugs.

Before taking these drugs, you may want to discuss the need for that particular prescription with your doctor, as you might qualify for another option. Should you begin taking these antibiotics while having an already existing tendon injury, be extra cautious with your activity for at least a month (negative effects have reported up to three months later). If you begin to have tendon pain while taking them, get in touch with your prescribing physician.

Having seen many patients who underwent surgical tendon repair procedures, a tendon rupture is not an injury that you want to deal with if it can be avoided. The likelihood of rupture is rare with 15-20 cases per 100,000 drug uses. If you must use that specific family of drugs be sure to monitor yourself, cut back on your exercise routine and talk to your physician if you should start to develop tendon region symptoms.

The information provided here is for informational purposes only. If you are concerned with your antibiotic use, seek further guidance from your primary care medical professional. 

Geek out:

  • http://www.fda.gov/Drugs/DrugSafety/InformationbyDrugClass/ucm500325.htm

  • http://www.runnersworld.com/injury-treatment/fda-warns-of-tendon-damage-linked-to-antibiotics

  • http://www.medscape.com/viewarticle/410546_3

  • http://www.ncbi.nlm.nih.gov/pubmed/15777120

  • http://www.ncbi.nlm.nih.gov/pubmed/12587511

  • http://www.ncbi.nlm.nih.gov/pubmed/8863030

  • http://www.ncbi.nlm.nih.gov/pubmed/8832995

  • http://www.ncbi.nlm.nih.gov/pubmed/11409663

  • http://www.ncbi.nlm.nih.gov/pubmed/21686678

6 Deckers Creek Trail Half-Marathon Recovery Tips

Hope you had fun in the race. That last mile is brutal, right? Here are a few considerations to improve your recovery.

  1. Active recovery. At a minimum, go for a short walk. It can be slow and relaxed. If you are more experienced, going for a short run isn’t out of the question, of course. Going for a swim is a great choice too. Anyone with at least a couple months of training under their belt will feel better having performed active recovery - if it’s done correctly. It will take at least 10 minutes of activity to get to that point though.
  2. Avoid anti-inflammatory drugs. Inflammation gets a bad reputation because it’s usually accompanied by discomfort. But you need those processes to heal properly! Let your body do what it is meant to do in recovering from muscle soreness. Besides, over-the-counter anti-inflammatories are actually not very effective at improving the discomfort associated with delayed onset muscle soreness.
  3. Ice anything that seems like a new injury. Yes, inflammation has a good side. But a true new injury (besides muscle soreness) can have a little too much of that inflammation. Ice is nice to be able to spot treat anything that has flared up without having the systemic effects of medication. Ice now so these areas are not still an issue in three days.
  4. Regain normal hydration levels. It was hot and humid, so there is no doubt that you lost more fluid than you took in. Your urine shouldn’t be dark in color. It should be more like the color of a light beer. Drink 6-8 ounces of plain water every hour until you have achieved that level of hydration. If you have gastrointestinal discomfort at this point, then there’s a really high chance that your hydration levels are off.
  5. Gently perform muscle self-massage. Use a foam roller, massage stick, tennis ball, lacrosse ball, or even a rolling pin from your kitchen to roll up and down the full length of the thighs and lower legs. It doesn’t have to be highly uncomfortable but a little tenderness is fine. Try for 30 strokes on every side.
  6. Take a nap. Sleep is a great recovery method. The weather stinks today anyway. If you feel fatigued or drained then take advantage of a quick nap to boost your endocrine system’s output of healing hormones.

4 bits of advice for running Deckers Creek Trail Half-Marathon

Share these with your running friends doing the race, especially the first-timers and out-of towners that haven’t experienced the glorious hills.

1. When in doubt, eat! The half-marathon distance lulls people into thinking they can complete it without a little fueling. It’s not about assuming you don’t have enough stored energy to get it done. I’m sure you do have the energy stores to finish. But don’t you want to finish strong? It’s about subtly tricking your body into thinking that calories are coming into the system. You will feel better during and after plus your recovery time is decreased if you eat during the race. Personally, I usually have half a banana at mile 5-6 but that’s what works for me and it might not work for you.

2. Don’t underestimate the last 2 miles of the course. You will be slapped in the face with multiple obstacles all at once. Best to expect and prepare mentally for them.

  • The course abruptly switches to pavement from compacted sand and pea gravel so your steps feel more harsh.

  • There is suddenly little to no elevation drop, which will force you to slow your pace and change your technique.

  • The temperature is much warmer because of the elevation loss up to that point, it’s later in the day, and there are no trees for shade.

  • Plus, you just ran 11 miles, all downhill, so your quads are already not happy. Did someone say heavy legs?

3. Keep your turnover slightly quicker than usual to avoid killing your quads (as badly) before those final 3 miles. With the constant descent, your tendency will be to overstride, which will definitely demand more of the quads with each step.

4. Conserve effort in the first two to three miles. In most races, you don’t want to start out too hard in the first mile. In this race, the grade pitches rapidly toward 2% at the end of mile one and can get you running far faster than usual. As a result, you don’t feel the higher effort in the earliest miles that you normally would expect. Your heart rate is going to take longer to come up than on a flat course so that’s not a good indicator. Being downhill, the first 10 miles create more of a muscular demand than the average half-marathon while being less stressful to the cardiovascular system than usual. Check your splits at mile 2 and 3 and then adjust accordingly. I doubt many people will come through the 5K split and say “that was too slow.”

5. Bonus: Watch out for the cicadas. Especially if you are faster than me, I suggest wearing safety goggles and knight armor.

Does foot pronation increase risk of injury?

There is a misconception that certain structural features of the body are directly related to injuries. For years, people with lower arches were referred to as “pronators” and those with even flatter feet were “overpronators” or “hyperpronators.” They were all thought to have more injuries, and a portion of the shoe industry has really kept that mentality alive. The other two general foot types, neutral and supinated, were the supposed ideal.

Image Courtesy http://www.mikevarneyphysio.co.uk/wp-content/uploads/foot_pronation_supination.png

If you watched the pronator group walk, they might not appear to maintain their arch height very well. But is that always a problem? In the people labeled as pronators there are often joint structure differences that allow more inward collapse of the ankle and foot. In the supinator group there are joint differences that would keep the ankle and foot raised upward. Regardless of foot type, some level of pronation is a normal movement because it allows for shock absorption as the leg is loaded. A certain amount of supination is also normal because it allows for a rigid push off.

We begin our childhood with a lower inner arch height, largely due to a lack of bony structure, and this results in a pliable foot. With normal growth, as the foot bones develop, the inner arch tends to rise and the bones of the leg also change their orientation a bit. In some people the arch really doesn’t increase its height much with growth. And even if it does, in adulthood there can be contributing changes that would affect foot and ankle position:

  • degenerative or use dependent joint changes at front of the foot, the middle of the foot, or the rear of the foot  

  • lower leg muscle shortening

  • weak, inhibited, or injured lower leg muscles or tendons (commonly the posterior tibialis)

  • general hypermobility throughout many of the body’s joints

  • tibia and femur bone structure (twisting, length discrepancy)

The concern is that these changes are also able to affect the movement of the knee, the hip and then even the pelvis and back. We all have a certain acceptable range of motion within each of these areas. If the changes in the foot allow the knee or hip to operate just on the edge of their tolerated position of use then, conceivably, you might have an increase in risk for knee or hip injury.

In actuality, foot structure may be more related to the type of injuries acquired than frequency of injury.

  • According to a 2001 research article in Clinical Biomechanics, higher arched runners developed injuries most often on the lateral side of the leg and had more ankle and bony injuries. Their lower arched counterparts had more knee and medial lower leg injuries.

  • A 2005 research article in the Journal of the American Podiatric Medical Association indicated that triathletes with a more rigid, high arch were at a higher risk of injury compared to neutral and pronated foot types.

  • More recently, in 2014, a meta-analysis in the Journal of Ankle and Foot Research indicated a very slight increase in risk of overall injury rate with the more pronated foot type being related to increased risk of kneecap pain and medial tibial stress syndrome (a.k.a. one of the types of shin splints.)

As you can see, the research is conflicting. The rate of injury is similar between athletes with all foot types. Perhaps we would have different results if we broke the common groups (pronator, neutral, supinator) down into subgroups based upon strike patterns (heel, midfoot, forefoot) to account for variations in demand.

My concern is that many of these studies assess the foot arch height while standing still. Unfortunately, this does not mimic how you use the foot in activity. Someone with a pronated foot structure while standing may not even touch their heel to the ground with running. Is it really going to be effective to put them in a motion control or stability shoe designed with a heel striker in mind?

A 2009 study by J. Dicharry demonstrated that while running the total motion of the navicular bone in the arch isn’t drastically different regardless of foot type. They called the pronators the hypermobile group in this case. Even if the arch of a pronated foot is at a lower position in standing, it’s total amount of motion is only slightly increased from a neutral or supinated foot while running. Neutral and supinated feet were 0.3 mm different between walking and running. Pronated feet were 1.2 mm different from walk to run. 

Should you be concerned with such minor differences and trying to use external devices like shoes to accommodate for them? The first step is to determine whether the pronation that is occurring is structural or a compensation. If forced to compensate, as in the case of decreased calf muscle length, you may need to focus on increasing mobility where it has been lost, like at the ankle joint, by elongating the calf muscles. Forcing mobility where it has already reached an excessive level in the midfoot by neglecting the calf length is not going to be helpful.

Our bodies are very good at adapting to gradually applied stresses, so a person with a more flexible, lower arch should be able to safely progress their activity just like anyone else. The research would suggest addressing the tissues that are the most likely to be injured with each foot type.

For instance, someone with a higher arch could focus on single leg balance and strengthening of the outer lower leg muscles. Those with a lower arch could focus on increasing strength of the inner lower leg muscles. I suggest we should focus on keeping both sides of the lower leg as strong as possible without one side becoming more dominant.

An often overlooked factor is inner foot muscle strength. Several of those muscles are meant to stabilize the arches of the foot, so it would be no surprise to me that decreased inner arch height can be associated with decreased muscle strength. But it’s not always a 1:1 relationship. Little research exists on this because it’s difficult to measure intrinsic foot muscle strength. Look for my blog article on intrinsic foot muscle strengthening soon.

Final thoughts:

  • Progress running intensity and duration in a safe manner using the 10% rule.

  • Keep the calf muscles loose to prevent ankle motion loss with a combination of rolling, massage, dry needling, and maybe stretching.

  • Strengthen the muscles that take the ankle and foot in all directions.

  • Strengthen the intrinsic foot muscles.

  • A pronated foot type does not necessarily require a bulky, stiff shoe and orthotics.

  • A pronated foot type is not going to be an immediate cause of injury, there are other factors to consider.

  • Don’t spend too much time worrying about your foot type because anatomical variation is normal.

  • Let your feet work how they were intended.

Geek out:

http://www.ncbi.nlm.nih.gov/pubmed/19648718

http://www.japmaonline.org/doi/abs/10.7547/0950235

http://www.clinbiomech.com/article/S0268-0033(01)00005-5/pdf

http://jfootankleres.biomedcentral.com/articles/10.1186/s13047-014-0055-4

http://journals.lww.com/cjsportsmed/Abstract/2001/01000/The_Role_of_Impact_Forces_and_Foot_Pronation__A.2.aspx


Please let me know if you have any questions at derek@mountainridgept.com and feel free to share this article via the share button below.

7 Keys to Managing the Discomfort of Exercise

It’s understood that moving quickly and for long periods can be downright uncomfortable. We always have the option to control the situation by either stopping or slowing down. But you also have the option to see if that pain can be managed with other mechanisms so that you don’t have to stop or slow.

Exertion discomfort is a term that describes the typical discomfort associated with performing exercise at a higher intensity. Most athletes, competitive and non-competitive, have encountered this discomfort at one point or another. Some athletes may find it addictive and thrive on that sensation of pushing themselves. Other athletes struggle with tolerating exercise-related pain.

Depending on an athlete’s training level, terrain, intensity, and technique, they could experience general exertion discomfort in a variety of locations throughout the body. General exertion discomfort:

  • Stops after 30-45 seconds of rest.

  • Tends to be present in the muscles that are working hardest.

  • May also occur throughout the chest or cause a “whole body” experience.

  • Occurs predictably with a certain speed of movement, specific effort, or number of repetitions.

Experience will be a significant part of determining the type and level of exertion-related pain any athlete can tolerate. Experienced athletes have often learned a few tricks in managing that pain, as it is an expected and predictable occurrence. Newer athletes often haven’t yet learned the skills needed to manage the discomfort. Regardless of experience, some athletes are simply able to mentally cope with this discomfort better than others.

Here are six tips to help improve exertion discomfort tolerance.

Do a body scan. A body scan is a head-to-toe self-assessment that you perform while moving to determine if you are staying relaxed and maintaining the technique that you need to maintain. Remember that song “Head, shoulders, knees and toes?” The writer must have been a runner. A specific area of discomfort can be a clue that you need to focus in on an area and make an adjustment. For instance, if I feel a little discomfort in my shoulder blade region I might ask myself a couple questions: “Are my arms swinging nearly straight forward and backward and equal amounts?” Or “Am I rounding one shoulder forward more than the other?” The answers are often able to pinpoint the problem and then I adjust my technique to correct it and the discomfort subsides.

Take a deep, cleansing breath. This can force you to vary your breathing pattern but also works well to fully expand your lungs, expel any buildup of CO2 and let you relax your shoulder and neck muscles, where many of us carry tension. It’s a good reminder to breathe deep toward the stomach and not depend on the assistive muscles. I’ll often perform this deep breathing after doing a body scan because I have a tendency to tense at my shoulders and neck.

Vary your technique to place the demand elsewhere. One place of common discomfort is the leg muscles. Another common area is more focused at the chest and lungs. If a runner is taking longer strides then this will tend to fatigue the thigh muscles, particularly when climbing. If that thigh pain is getting out of hand then you want to tighten up your strides to quicken the turnover. After performing that change for 30-60 seconds, you may notice that your chest and lungs are now the bigger problem. Likewise, a burning fatigue at the chest can be decreased with a switch to intentionally longer strides to load the muscles more while giving the respiratory system a slight change.

Get your mind right. Positive mindset is a large part of the solution when dealing with exertion-related discomfort. If you know what to expect because you have prepared well, then you are far less likely to get caught up in the negativity that can come as you tire. In training, you must be willing to meet a point of discomfort so that it is familiar to you during competition.

Use a mantra. Or anything that you can repeatedly go over for periods of time in order to improve your technique or provide a distraction. It could be something like “quick and light” or “pick ‘em up, put ‘em down.”

Check your eating. If you haven’t taken in a sufficient number of calories, your psychological state will suffer. Our brains rely heavily on a certain level of blood sugar. As the blood sugar level drops you will tend to have greater negative emotional responses. And no one is going to perform at their best with continually negative self-talk. 

Use other effort indicators. One of my favorite indicators, especially in a long event, is heart rate. I know from prior experience what range of heart rate I can tolerate for a given time. Going above the expected range is taking a known risk. Another indicator can be pace, which is more variable if the terrain fluctuates. These indicators can provide a more objective measure of effort before you get to the point of discomfort. The goal is to hone in on and remain controlled within the performance range that allows you to achieve the most success. It takes the guesswork out of relying only on feel. 

And in case you aren’t sure yet of how hard to push yourself in exercise, consider that there are certain types of pain that are unexpected and not to be ignored. Muscle, joint, or bone pain caused by an injury could be recognized by any one of or a combination of these factors:

  • Located at a single side of the body. For example, just one leg or arm.

  • Specific to a smaller area, particularly at a joint.

  • Started after a specific injury, like rolling an ankle or twisting a knee.

  • Doesn’t subside within about 45 seconds of stopping activity.

  • Intensity might actually worsen at rest.

  • Is unfamiliar in location and intensity.

  • Intensity of pain doesn’t correlate with intensity of effort.

  • Often described as sharp or severe.

I can be reached at derek@mountainridgept.com if you have any questions. 

Training errors in the athlete, part 6

Too much, too soon, particularly after an injury. Most athletes understand that progressing too quickly in their regular training can cause injury. What they don’t often understand is how to return to sport after an injury. This is the easiest time to go too hard or too long. You can have the “I’m all better” concept down too well.

Injured or not, the body is only capable of adapting at a certain rate. Some tissues can adapt in a few days (cardiovascular system, nervous system pathways), some in a few weeks (muscles), and others in a couple months (tendon, bone). Depending on the location of the injury you must consider what are known as “tissue healing constraints.” For example, a tendon overuse injury can take 1-3 months to resolve with correct progression. A low-grade muscle strain could take 1-4 weeks.

If a runner has tendon pain from a new tendinitis that has been present for 3-4 weeks then I would expect it is going to take weeks, not days, before returning to their pre-injury mileage. It doesn’t always mean you can’t run at all during recovery. It must be a controlled progression. And there is always some type of cross training you can do.

The first day back to running should not be a 5 or 7 mile long run, regardless of terrain or intensity. And that’s what I see many people try to do when they return from injury. They want to get right back up that mountain quicker than they came down it. Stay in the valley for a couple days. For every week away from running I would expect a need for at least a 30% drop in average weekly mileage upon return.

It’s going to take at least a week of no exercise before you actually have a loss of fitness. The fitness losses from 2 weeks of inactivity are similar to those of 4 weeks. And I’m sure you have been cross training to minimize those losses. Point being, don’t rush back into it simply to regain fitness that doesn’t really need to be regained.

Not listening to your body’s warning signs of insufficient recovery. This is similar to what I mentioned last week about not respecting a specific injury early. But you also need to consider a whole body factor. Something is up when your muscles have been feeling constantly tired before, during, and after workouts. You might wake up more groggy than usual or old injuries start to reappear. You need to consider what your body is trying to tell you.

It’s normal to feel a little stiff and achy in your muscles when you start to push them. But when a slow, easy warm-up doesn’t put some pep back in your step after 20-30 minutes then there’s a good chance you could be digging yourself into a hole. If you feel good at that point, then a hard workout is reasonable. If you still feel slower than normal and better yet, are actually slower than your normal, then it’s not a day to push your effort.

For the uninjured, refrain from making any judgments about how your workout is going to proceed until your system is well warmed-up, at least 15 minutes into exercise.

Not performing regular soft tissue maintenance like foam rolling, massage, and compression in recovery, especially after the hardest and longest efforts. Repetitive wear and tear beats up your muscles. Unhealthy muscle tissue equals decreased performance and even pain. As athletes, we surely can’t expect that pushing into exercise-related discomfort multiple days per week generates only 100% positive adaptations in the muscles and other tissues. There are gradual negative adaptations too, like trigger points, adhesions, and loss of muscle tissue length.

Show those muscles a little love with self-massage. Help your lymphatic system function at its best by preventing fluids from accumulating in the spaces around your muscles and other tissues with compression. Options for compression include compression socks or for a more massage-like treatment, a pneumatic compression system, like the Normatec. Most athletes find that massage and compression simply feel good after prolonged exercise.

Let me know if you have any questions: derek@mountainridgept.com

Running technique: 3 reasons why runners develop shin splints and 7 ways to fix them

I really dislike the term "shin splints." Probably more than you dislike actually having pain from shin splints. That's because the term has been used to describe about five different problems that occur in the lower leg. It's terribly vague.

The term "shin splints" has been applied to injuries that are more specifically described as medial tibial stress syndrome, tibial stress fractures, and exertional muscle pain. Exertional muscle pain is the most common type of problem, so for the sake of this article, I will refer to the shin muscle and tendon pain from exertion as “shin splints."

One of the shin muscles is the anterior tibialis, which is the biggest muscle on the front of your shin region. It’s main function is to pull the front of your foot upward. That's called dorsiflexion (see photo). It's helped by the neighboring extensor hallucis longus (EHL) and extensor digitorum longus (EDL) muscles.

While walking and running, they keep you from catching your foot and toes on rugs, roots, stones, steps, and generally rough surfaces. We’ve all caught a toe, tripped, fallen and groaned in pain as we lie on the ground. These are the muscles you can thank for keeping you from biting it everyday.

There are several reasons why runners will develop exertional shin splints. Some of them include:

Heavy reliance on heel striking. This is the most likely reason a runner, especially a new runner, would develop shin muscle overuse pain. With a heel strike, you must increase use of the anterior tibialis muscle or your foot will slap down to the ground. Runners who heel strike demonstrate a greater dorsiflexion (pointed up) angle upon ground contact compared to a runner who lands with their entire foot flatter or on their forefoot.

In the picture below the ankle is pulling up into dorsiflexion 15 degrees above a neutral ankle position. This is in contrast to the midfoot strike images below where the foot is contacting the ground in a slightly plantarflexed (pointed down) angle. In order to lower the front of the foot to the ground from a heel striking position, the anterior tibialis muscle needs to work extra hard. All of that extra work results in a chronic state of overuse in the shin muscles and tendons, which is easy to imagine when you are asking them to perform 700 contractions per mile. 

Initial contact with heel strike pattern

Overstriding in the forward direction. Along with the heavy heel striking pattern, reaching the leg too far forward with each step will increase the stress on the shin muscles. You can use a heel strike pattern without causing shin splint pain if your foot contacts close to your center of mass. Imagine your center of mass being a line drawn straight down from the center of your hips, as in the following picture. If the foot contacts the ground 12 inches in front of the line instead of 10 inches, the demands are much different on the muscles, tendons and joints.

Most runners who shorten their stride in the forward direction start to land on their midfoot instead of their heel. Compared to the heel strike picture above, using a midfoot or forefoot strike pattern (and sometimes a slightly quicker turnover) causes the stride to be slightly shorter in the forward direction. That's evident with the lower hip flexion degree value. But it's most noticeable that the distance line to the point of contact at the bottom of the picture is clearly shorter than in the previous heel striking picture. It is possible to make an initial contact at this same closer point and use any of the three types of contact patterns. 

Initial contact with midfoot strike pattern

Short/tight calf muscles. If the muscles on the back of your lower leg are so short that you can’t take your ankle into the normal level of upward dorsiflexion motion, the shin muscles are going to need to work harder to overcome that passive resistance. One quick way to assess whether the muscles on the back of the lower leg are too short is to do a full squat. Barring any unusual knee or ankle joint and bone issues, if the feet can't stay flat on the floor, especially without turning the feet out or the arches collapsing, you may have a limitation in the length of those muscles.

Tips for correcting these issues.

1. In the cases of both heel striking and overstriding, the solution is much the same. The foot needs to land closer to your center of mass. You could simply think about taking shorter steps. You can think about it landing directly beneath you (which will never actually happen). A one-inch change in the initial contact point is going to feel like a 12-inch change but I assure you that the awkward feeling is normal at first.

2. Some runners need an external focus to prevent overstriding forward, so matching their cadence to the beat of a metronome can be helpful. Count the number of steps you take with one leg in one minute of running. Those who overstride are often taking less than 82 steps each minute. The metronome can be set for a value greater than 82 while you try to match the step rate with one leg.

3. For tight calf muscles, everyone’s first thought is “stretch.” Stretching is fine if you hold the stretch for at least 1 minute but 2-3 minutes is more effective to mechanically lengthen these tissues. And you would have to do it daily for at least a month to get much change. It can be more effective to perform soft tissue work with a foam roller, massage stick, tennis or lacrosse ball, massage therapist, or manual therapy from a Physical Therapist. Regardless, just try something! Lessons on muscle rolling here.

4. Relax the anterior tibialis muscle with consistent soft tissue maintenance. Trigger point dry needling or myofascial release can work wonders to make the muscle happy and decrease pain quickly. The massage stick can be great too. Lessons on muscle rolling here.

5. Practice engaging the anterior tibialis muscle by walking on your heels for 30-60 seconds continuously each day. Preferably after your symptoms have calmed down a bit.

6. Progressively increase your mileage. Going for a 4 mile run after a month of no running is a huge training error. Sometimes those muscles just need to be conditioned correctly. 

7. Try a different shoe with a lower heel height. Pair this with the other solutions. A thicker heel can mean greater shin muscle load. And that thick heel is often the reason people heel strike hard in the first place. 

If you battle repeatedly with shin splints, consider having a thorough running technique and gait evaluation. Yes, I can get the pain to go away easily with a couple treatments but don’t you want to keep it away permanently? A couple of small changes can mean a huge difference in your pain onset.

I can be reached at derek@mountainridgept.com if you have any questions. 

Please share this article with your running friends! To receive updates as each blog comes out, complete the form below. I can be reached at derek@mountainridgept.com if you have any questions. 

Training errors in the athlete, part 5

Training with other people all the time. Do you thrive on attention and praise in order to push through a workout? Sometimes you just need to go it alone to build the mental fortitude required to perform at a higher level. I mean Rocky Balboa trained alone most of the time and he seemed pretty talented so that has to be a sign it will work for you too. Gonna fly now...

I don't see anyone else around, do you?

Moving on to the other end of the spectrum, there’s the chance that other athletes can push you too hard, too often. Peer pressure kicks in and although your instinct says “that’s enough,” you go beyond your safe limitations and become injured. Save it for the competition. That’s where it is nice to have a coach to tell you when to shut it down.

Skipping the warm-up. Warm your muscles up slowly and they will perform better. A gradual warm-up can improve performance. Research indicates muscle fiber exposure to lactic acid just before intense exercise allows the fibers to tolerate even more lactic acid production. The physiology of the muscle fiber can function better at a higher temperature too (up to a point of course).

According to a 2012 literature review in BioMed Central Medicine, a proper warm-up containing “stretching, strengthening, balance exercises, sports-specific agility drills and landing techniques” can be effective for preventing injury. This is unfortunately more involved than many athletes envision when thinking about a warm-up routine and they shy away from it as a result. 

At the least, warming-up should be a whole body routine that emphasizes full joint mobility, a gradual increase in heart rate, directional changes, and most importantly, rock music. The warm-up period, especially just before a competition, can be a powerful psychological motivator.

Ignoring joint mobility and flexibility. Some people have really poor mobility. I don’t mean, can you bend over and touch your toes? I mean will your hip flex to a full 120 degrees to allow you to squat all the way down at Crossfit? Do your ankles have the full range of motion necessary to prevent your arch from collapsing while running? Limits in mobility set by a single joint or muscle can impact movement further away than you might realize (ie. ankle movement can change hip movement).

The type of exercise you expect to participate in should dictate what motions you need to improve. If there are specific known limitations, they should be addressed in order to decrease stress on adjacent tissues and regions. Mobility limitation is the reason that the Crossfit “Mobility WOD” exercises exist. The point is that you have to take care of your body with a little routine supplemental work in order to enjoy your regular sport safely and improve performance. 

To Foam Roll the IT Band or Not to Foam Roll the IT Band?

There are about 50,000 articles on rolling or not rolling the IT band, or iliotibial band, on the internet right now. So now there’s 50,001 with my addition. There’s every topic from “you’ll never get the ITB to stretch out” to “don’t roll it because the problem is actually at your hip” to “keep rolling the ITB.”

I agree, the ITB is so thick and strong you are wasting your time to try to specifically stretch it or roll it out. According to an older article (1931) from the Journal of Bone and Joint Surgery by C.M. Gratz, MD:

“The specific gravity of fascia lata is about 1.31 and the average ultimate tensile strength is approximately 7,000 pounds per square inch. Soft steel has a specific gravity of 7.83 and an ultimate strength of about 45,000 pounds per square inch. Thus fascia lata is nearly as strong as soft steel, weight for weight.”

Image courtesy MedBridge Education

The IT band needs to be a strong material. The IT band functions are to stabilize your knee and produce hip movement by working along with the tensor fascia latae and gluteus maximus muscles (refer to the image below). And yes, lateral knee overuse injuries, including IT band region problems, tend to be related to weakness or abnormal activity at the hip and trunk muscles. Maybe something is wrong down at the ankle and foot too.

You shouldn’t be relying on the rolling, or any soft tissue technique for that matter, to make up for lost strength or bad exercise mechanics. Those body mechanics need addressed and your strength needs to improve. It wouldn’t surprise me that a lateral knee pain sufferer would also have weak gluteus medius and gluteus maximus muscles. Most people could use stronger glutes. And maybe you shouldn't have suddenly done a 2 hour long workout when your longest had been 1 hour. 

What the anti-rolling crowd is forgetting is the fact that the IT band is covering a pretty big portion of quadriceps muscle. Because it’s generally a positive to routinely roll or massage the rest of the quadriceps, why would you suddenly neglect such a big part of it? I wouldn’t, personally.

And what if that lateral knee pain is actually coming from trigger points in the quadriceps? At least the rolling was helping to keep the quadriceps relaxed and generally making the nervous system happier.

If you bought into the “no ITB rolling” philosophy, think it over again. At the very least, use a tennis or lacrosse ball to roll the thigh directly in front of the IT band and directly behind it. Take care of your quadriceps and hamstrings muscles. Use the ball, massage stick, or foam roller on the tensor fascia latae muscle too, up at the front/side of each hip.

Strengthen your hips and keep on rolling.

Training errors in the athlete, part 4

Underestimating the importance of proper recovery. When it’s time to work hard in a workout or competition you need to have some gas in the tank. That tank doesn’t get filled up without good recovery techniques like full days off, active recovery days, consistent sleep, compression, nutrition quality and timing, proper hydration and muscle maintenance.

If you start every competition or workout on a half tank, guess what happens? You go half as far with half the intensity. Sometimes that's intentional and planned. But many times it's not. Then as injury and overtraining occur, you have to ask yourself, “What am I really getting out of this?” In order to feel your best, remain healthy, and perform at your best, recovery is a huge part of the equation. Don't dig yourself into a hole that you can't get out of. 

Not working hard enough to produce a strong stimulus that the body wants to adapt to. Athletes are supposed to be constantly pushing their bodies on many of their training days. That’s how you become better, right? Unfortunately it’s also how you become overtrained, injured, stale, and burned out.

This leads you to constant training at a moderate effort on “dead” muscles. Or running the same distance every day. Monotony is the straw that broke the camel’s back. For runners, yes, you need days to emphasize aerobic conditioning in easy efforts ranging from 30 minutes to 3 hours. Other days you can have interval training that emphasizes anaerobic work at a really high effort for anywhere from 30 seconds to 5 minutes. Sure there’s a place for a moderately paced tempo run of 15 to 60 minutes, but not every day.

Strength training athletes need to avoid constantly using a weight that causes failure at 10, 12 or 15 repetitions. Or always doing just one set. If you are really after a change in performance, there needs to be a training cycle where the weight is significant enough to cause failure at other points, like 8, 5, or even 3 repetitions. And other times it’s fine to do 20 repetition sets. The point is, change the stimulus.

Indoor general fitness athletes are often one of the most guilty of this mentality. Three and four times per week they bounce from one cardio machine to another, being sure to start breathing harder and break a sweat at each machine for 10 or 20 minutes. They occasionally check their heart rate and compare it to the machine’s chart. No surprise to see a heart rate of 70% of the predicted maximum. And they wonder why they never see significant fitness changes.

Then there are the athletes that push a little harder but it’s just to that 85% level, which definitely hurts more. But then they struggle to sustain it as one steady effort for longer than 10 minutes (because it hurts) at which point the effort drops a notch. Meanwhile, other people in the gym are barely working at all.

In any sport, the key is variety. Variety in intensity, duration, training surface, speed, force produced, and direction of movement. Yes, you want adaptation to a consistent stimulus for a while but then you have to change that stimulus to continue making gains. 

Ignoring injuries when you first begin to have symptoms. Some injuries classically only hurt at certain times in their formation. That doesn’t mean they aren’t a problem. It doesn’t have to hurt all of the time to be a problem. Don't ignore it. Never ignore it. Yes, you can try to treat it yourself for a little while. That really might work.

But please make your life and my life easier by just coming to Physical Therapy within a couple weeks of the problem onset, even if it’s just for a consultation. If you don’t like what I have to say about it then seek another opinion. Regardless, if you intervene early, and start the right treatments, your recovery time is going to be drastically different.

For instance, if I see someone with back pain from a sacroiliac joint sprain in the same week they are injured, then they often recover in well under a week. If the sacroiliac joint has been a problem for 2 months and had no proper treatment, then buckle up for at least a month of consistent work. #getPT1st

Training errors in the athlete, part 3

Relying on ibuprofen, naproxen, acetaminophen or other over-the-counter drugs during and after exercise to counter muscle soreness. It’s one thing to take medications for a known sprain of a joint or strain of a muscle. Those are good reasons to use these medications because the level of tissue damage is drastically greater. In that case, if you normally do well with over-the-counter medications then, by all means, take them. But stay hydrated and don’t exercise heavily while taking them.

Our bodies adapt to exercise by rebuilding the minor tissue damage that occurs during the exercise, but with a little better structure. By using anti-inflammatories, recent studies indicate you are actually hampering some of your body’s normal recovery processes. Let nature run its course.

Focus instead on good nutritional habits, like eating during and immediately after exercise.  Patience and tolerance as your body recovers after exercise are key.

And please don’t take anti-inflammatories while you are exercising because:

  • They can be highly damaging to your kidneys as you become dehydrated.

  • They can impact your blood pressure negatively.

  • There are also problems in the way the drugs act with higher body temperatures and can change otherwise normal processes in your body during exercise.

  • Their intake can lead to intestinal bleeding, cramping, diarrhea and maybe even a trip to the emergency department if the dose is high enough and you’re dehydrated.

Not performing plyometric training. It’s probably not a good start if you are currently saying “What is plyometric training?” Plyometrics can be a great way to increase overall speed and power. They are also great for improving your confidence with foot placement and directional changes because more advanced exercises require agility as well. And if you have a hit a plateau in your training, they can help you break through it. That can be true for sprint athletes and endurance athletes. Keep your body guessing.

Lateral hops are a great plyometric Drill for many athletes

Lateral hops are a great plyometric Drill for many athletes


Not having goals, short-term and long-term. Is your long-term goal to be a 5K runner until you are 80? To stay in shape to chop two cords of firewood next month without back pain? To squat 300 pounds for a one repetition maximum in three weeks? To avoid a family history of cardiovascular disease with indicators like blood pressure below 130/75 until you are 50? Write your goals down. Determine a time-frame. Maybe six weeks short-term? Maybe six months long-term? It’s going to depend on the type of goal. And 40 years long-long-long-term? Remember the SMART concept for making goals - specific, measurable, achievable, realistic, time-bound. Simply saying “I want to be stronger and faster” is not specific, measurable or time-bound. Achievable and realistic, maybe. But how will you decide achievement of being stronger and faster without a measurement?

8 Shoulder pain and rotator cuff care tips

While shoulder pain can be caused by a variety of injuries, rotator cuff impingement is one of the more common causes. It can occur in a variety of people, younger and older. The rotator cuff is made up of four muscles on your shoulder blade that stabilize your shoulder joint, as seen below. Impingement occurs when part of the tendon is repeatedly compressed. It is often poorly managed with corticosteroid injections. Mechanical stress that would have caused these tendons to become painful requires mechanical treatments, not a drug, for true correction. 

You are at risk for rotator cuff tendon or "subacromial" impingement if you currently have or have had:

1. Decreased total shoulder motion - Can you get your arm straight overhead? Can you touch your hand all the way up to the bottom of your opposite shoulder blade?

2. A rotator cuff muscle or tendon injury, like a strain or a tear - This would have been diagnosed by a medical professional.

3. A “frozen” shoulder - Also would have been diagnosed by a medical professional.

4. Poor trunk and shoulder blade posture - All people are guilty of this at some time or another. We round our backs and let the shoulders rock forward. We drop our heads forward and down.

5. Weak rotator cuff muscles - This applies to many people, even those that have labor jobs or athletes that demand heavy use from their shoulders.

6. Weak shoulder blade muscles - This occurs in most people, unless they are specifically strengthening these muscles and is often a result of the poor trunk posture. 

7. Irritable rotator cuff muscle trigger points (aka knots) - Applies to many people, unless they regularly have a deeper massage or routinely dig and smash on those knotted trigger points themselves.

Certain activities also make shoulder impingement more likely:

1. Long periods of work with the arms overhead

2. Participating in throwing sports, like baseball

3. Participating in swimming, especially freestyle, backstroke, and breaststroke

Combine any of these activities with the problems listed above and it is not unusual to start having shoulder pain from rotator cuff impingement.

Here is a list of items you can try to decrease the chance of developing a rotator cuff impingement issue or to address an early rotator cuff problem.

1. Massage the rotator cuff muscles with a ball, like a tennis ball, while leaning against a wall. A couple of these muscles are easy to reach because they are on the back of your shoulder blade. Move your body up and down and side to side while keeping a moderate pressure on the ball. Focus on the more tender areas. Perform for 1-3 minutes.  

2. Light rotator cuff muscle activity with your arm at your side. This could be as simple as the “isometric” exercises in the pictures below. Push 5-10 seconds with a minimal to moderate level of pressure. The goal is to perform repetitions without pain, not to create maximum force. More is not always better. Try just 5 repetitions of each position early and if that lowers your pain then attempt to work up to 20 repetitions over one week of time.

Hand pushes into wall 5-10 seconds from the shoulder. 

Hand pushes into wall 5-10 seconds from the shoulder. 

hand Pushing into wall 5-10 seconds from the shoulder. 

hand Pushing into wall 5-10 seconds from the shoulder. 

Hand or wrist pushes into wall 5-10 seconds from the shoulder. 

Hand or wrist pushes into wall 5-10 seconds from the shoulder. 

Wrist pushes into wall 5-10 seconds from the shoulder.

Wrist pushes into wall 5-10 seconds from the shoulder.

3. When sitting or standing, focus on remaining tall with your torso posture. Focus on the shoulder blades squeezing back even if it’s just a little more than your usual. A small change can go a long way toward decreasing stress on the shoulder muscles and tendons.

4. For swimmers, address any swimming technique issues such as crossing midline during the freestyle stroke. You may need to discuss this with a swim coach or a medical professional experienced with treating swimming athletes.

Copyright Johnson, JN in Physician and Sportsmedicine, January 2003

Copyright Johnson, JN in Physician and Sportsmedicine, January 2003

5. Move your keyboard and mouse closer toward your body if you work at a desk in order to keep your arms closer to your side and not reaching forward.

Screaming for shoulder and neck problems. 

Screaming for shoulder and neck problems. 

Get a little bit closer...

Get a little bit closer...

6. Avoid working overhead. This is especially true if you have to push firmly with the arm, like while using a drill or paint roller.

7. Do not completely avoid moving the arm. This increases the chance of developing stiffness in the joint that could lead to adhesive capsulitis, otherwise known as a frozen shoulder. Please don't put your arm in a sling unless a medical professional determines there's a bone broken or you just had surgery on the shoulder.

8. Avoid heavy overhead lifting. Of course, heavy means different things to different people. If you *think* it’s heavy at all, it probably is.

Don’t let your shoulder pain stick around for too long. One to two weeks is reasonable if it is steadily improving from a moderate level of pain. In some instances, these suggestions can help shoulder pain. By no means are they meant to resolve a major shoulder injury though. They are not intended to provide diagnosis or true medical treatment. When in doubt, seek medical advice from a qualified medical professional.

If you have any questions about resolving shoulder pain with your work or hobbies, mail me at mountainridgept@gmail.com.


Training errors in the athlete, part 2

Poor hydration habits before, during, and after exercise. Our bodies are around 55-65% water. Humans can live for weeks without food but only days without water. We depend on good hydration for basic function of our systems. For athletic performance, the demand is even greater because athletes need to maintain a greater blood volume, sweat for temperature regulation, sustain tissue integrity, and repair exercise-induced damage and injuries.

Dehydration will decrease blood volume and with that decrease you won’t be able to cool yourself effectively or supply the working muscles with enough blood. If your core temperature reaches 103-104 degrees, the hypothalamus in the brain will just say “no.” Your movements will slow down and your entire nervous system will not function at its optimal level. And nobody loves that dizzy feeling of decreased blood pressure after you stand up from sitting or lying down when dehydrated.

As far as structure is concerned, hyaluronan molecules bind with water to keep your connective tissues, like cartilage and tendon, strong, supple and resilient. Keep the hyaluronan happy by staying hydrated! And we want the muscles to remain loosey-goosey!

Take in 5-10 ounces of fluid every 15 minutes in a warm to hot environment during exercise. Otherwise, try to keep your urine nearly clear. Don’t over drink though, as that can have negative consequences as well.

Avoiding strength training. People tend to gravitate toward what they enjoy most. For many athletes, they just want to do their sport and that’s it. Unfortunately, regardless of sport, some muscles and movements aren’t worked hard enough or frequently enough. We will become very good at using certain muscles, like the hip flexors, which slowly shuts down important muscles like the gluteus maximus.

Core strength is important regardless of sport because your trunk needs to be a stable base while the arms and legs move. As running guru and PT Jay Dicharry says, “You can’t fire a cannon from a canoe.”

A loss of muscle mass as we age can be counteracted (to some extent) with strength training. Overall, it comes down to being a healthy, well-rounded athlete -- and without strength training that’s not possible.

Being afraid to let go of a regimented training program. For those Type-A personalities this is difficult. Your long run doesn’t always have to be on Sunday. Some weeks, you might even need to skip that long run altogether. That twinge in your shoulder while swimming is trying to tell you something, so listen up.

Sticking to a “must do” mentality is a great way to dig yourself into a hole of over-training, injury, staleness, and boredom. That’s particularly true when you aren’t able to optimize the other aspects of training, like nutrition, soft-tissue work, compression, sleep, and so on.

I liken it to the “pay me now or pay me later” philosophy. Take an easier intensity day or a day off when you clearly need it or end up taking several of them in a row once your performance drops, you become ill, or you develop an injury.

The sacroiliac joint: An often overlooked cause of low back pain

At the base of your spine there is a really odd-looking bone called the sacrum. It joins with each side of your pelvis, making two sacroiliac (SI) joints. There’s not much motion at these sacroiliac joints. Beyond the sixth decade of life they probably don’t even move at all. Before that point, they move slightly with your normal activities, like walking.

There are times that one SI joint becomes more mobile while the other tends to become less mobile. This can lead to low back pain. Pain from the SI joint can also be felt at the buttock, groin and thigh. 

If the SI joint were to shift from its appropriate position, it often happens with a lifting activity, particularly if the body twists while lifting. Asymmetrical hip motion can lead to SI joint problems, especially if you often squat deeply for work or exercise. The muscles listed below may also contribute to the sides of the pelvis being twisted out of place gradually over time.

An SI joint problem is frequently seen along with some or all of the following negative muscle adaptations:

  • Decreased abdominal muscle activation or strength to provide core stability

  • Asymmetric hip flexor, hamstrings, and piriformis muscle length or muscle tension

  • Asymmetric gluteus medius, gluteus maximus muscle activation or strength

  • Asymmetric lumbar muscle tension

The amount of time since injury can be a predictor of success or failure in patients receiving treatment. The sooner a patient comes into the clinic after pain onset, the quicker they have a correction of the problem and a decrease of pain. 

Sometimes I don’t see these individuals until they have been in pain for 1-2 months and then their pain takes much longer to resolve because they have negatively adapted in the ways listed above. They are often given medicine and treated based on their symptoms, but the problem is mechanical and can’t be fixed with medication.

SI joint problems tend to respond very well to Physical Therapy intervention. The injury typically requires a combination of hands-on manual therapy and therapeutic exercises to resolve. If the patient has been hurting for less than a week then there’s a great chance of rapid success, particularly with manual therapy.

Contact me at mountainridgept@gmail.com with any questions about sacroiliac joint injury.


Training errors in the athlete, part 1

Which of these are you guilty of performing?

Specializing in a sport and being entirely unwilling to deviate: Variety is critical for injury prevention, mental outlook, and general health. Unless you are a triathlete, pentathlete, or decathlete, you might find yourself unwilling to stray from the single sport you know. First off, you should strength train. Strength training is no longer an option; it is a requirement. Crosstrain before you get hurt (and you might not get hurt in the first place). Try something that is non-competitive and don’t turn it into a competition. (Yes, that’s probably hard.) Take a yoga class. Play pickup basketball with a couple friends or just shoot around. Try swimming. Just do something that is very different than your normal and do it often. This is especially true for young athletes who aren’t finished maturing. Research suggests that athletes who didn’t specialize at a young age can perform better as long as they were performing some form of athletics. The key for all of us is simply being an athlete.

Assuming your skills and technique don’t need further work: Skill work is primarily about training your nervous system to use a specific pattern. A good overall athlete has more options for movement patterns. Some patterns are highly ingrained and some are not. You want instinctive patterns to be close to an ideal. That way, when fatigue occurs you still demonstrate precision and efficiency. Every athlete could improve their performance with at least weekly emphasis on movement drills, strengthening specific motions, increasing muscle power output, and basically fine-tuning they way the nervous system creates each sports-specific motion. Regardless of sport, there’s room for greater efficiency and adding skills to your repertoire. Even running, which some people assume is innate, is a skill that should be broken into components for drill work. 

Training alone all the time: Sure, you are probably mentally tougher than the average bear, but this problem allows you to slack off occasionally when there’s no one there to push you. Which means you drop into the dreaded moderate efforts that lead to “dead” muscles, overtraining, and slower than optimal nervous system patterns. My motto is “there’s always someone faster and stronger.” Go train with that person at least once a week. A coach could assume part of the role of a training partner, so I’ll give that half an exception.

7 Exercises to Get Ready for Gardening and Yard Work Season

As I sit and look at the snow that should have surely been gone for the season, I am reminded of the approaching outdoor tasks that many of us jump into at springtime. It can be an abrupt change from winter’s dark and lazy days. Try these exercises at least a week before the outdoors tasks to get the blood pumping and move through some of the motions that gardening and yard work require.

Abdominal bracing:

Why it’s important: This is the most critical exercise in this entire list. Any lifting or carrying task should be performed with your abdominals active. Unfortunately, many people don’t do this and it is one of the reasons they strain their low back while lifting.

How to do it: The easiest way to learn abdominal bracing is while lying on your back with the knees and hips bent, feet flat. Place your hands at the sides of your stomach, just above the hard bones that stick out at the front of your pelvis. Imagine drawing your bellybutton toward your spine while tightening the abdominals. Your low back may flatten out a little, which is okay, but don’t overemphasize this. Hold the muscle contraction for 3-5 seconds and perform 10 repetitions. You must be able to breathe while holding the contraction so if you are holding your breath, keep trying. Once you have good control of these muscles lying down, try bracing while standing. After that is easier, try walking and light lifting while holding the abdominal muscles tight.

Chair squats:

Why it’s important: Squats are great to get your knees bending under a repeated load and increase thigh strength. The strength will be necessary to lift yourself to and from the ground and while carrying or pushing heavy loads.

How to do it: Think of this as a slow way to get up and down from a chair. Preferably, do this without the help of your hands. Start with a stance slightly wider than your shoulders. Lower slowly to a chair over 2-3 seconds. As quickly as you can tolerate, stand back up from the chair over another 2-3 seconds. You’ll need to stay toward the front of the chair. If you can easily go up and down a couple times, try not to even bear weight on the chair, just use it as a reference point to lightly touch. Perform enough repetitions to make your thighs feel tired, about 10-20 times. As you gain strength and confidence, you could take the chair away to squat deeper but realize there will be no surface to rest on before lifting back up to a standing position.

Golfer’s lift:

Why it’s important: The golfer’s lift allows you to take strain off of your back when performing repetitive and lighter lifting tasks from ground level. This may be as simple as picking up a tool or placing a seed in the ground.

How to do it: Most people have seen a golfer reach to the ground for their tee or ball. You are going to mimic that motion. Starting in a standing position, pivot your trunk forward from the hip of the weight-bearing leg. The other leg raises up behind you for every same degree the body goes downward. Lower down and return to standing. Emphasize keeping your back straight. You may want to hold onto a countertop or table with one hand when trying this the first few times. Repeat 10-20 times. Switch sides. Once you have the motion down, try it without holding on for balance.

Lunges:

Why it’s important: Lunges are another way to build those thigh muscles that help with getting yourself up and down to the ground. They also work hip muscles that help when you push down onto a shovel or pitchfork.

How to do it: Take a step forward with one leg that is about 50% longer than your usual walking step. Drop your body straight down toward the ground over 2-3 seconds by bending both knees. The forward knee will need to bend more than the rear knee. Don’t go so far down the rear knee touches the ground. Keep your trunk tall the entire time. Push back up within 2-3 seconds and repeat. Perform 10-20 times. Switch sides.

Bent over rows:

Why it’s important: Bent over rows are a great method to build the shoulder blade muscles and the low back. It’s nearly impossible to do much gardening without bending over sometimes. And the rowing motion is a way to use the shoulder blade muscles you need to pull weeds, use a hoe or lift.

How to do it: You will probably want to do this with some light weights of 3-10 pounds in each hand. Bend forward from your hips, not your low back. In fact, focus on keeping the entire back from the neck down in a straight line. Once there, allow the weights to drop forward toward the ground and then pull the arms back toward you, as if you were rowing a boat. Squeeze the shoulder blades together. Do not shrug the shoulders up toward your ears. Drop the arms down and repeat. Perform 10-20 repetitions, or until fatigue begins in the back or arms.

Farmer’s carry:

Why it’s important: One of the most realistic exercises you can try is the farmer’s carry. As a gardener, you are going to frequently carry buckets of water, soil, and tools. And those are often carried on just one side of the body. This puts a large and awkward demand on the low back and abdominal muscles.

How to do it: This exercise will also require weights. You could use an actual bucket filled partially with water, sand or dumbbells or just hold a dumbbell of 5-10 pounds in one hand. Walk forward with the weight or bucket in one hand 10-20 steps. Turn around and switch the hand that is holding the weight. Walk back to where you started. That’s one repetition. Perform 5-10 repetitions. Start with easier weights and progress over a couple weeks.

Deadlift:

Why it’s important: Deadlifts should mimic the technique you use when lifting anything from the ground that weighs too much to allow you to use the golfer’s lift. Imagine lifting a bag of potting soil, heavy water buckets and even when starting out the movement with a wheelbarrow.

How to do it: You are doing a deadlift as an extension of the squats mentioned before. These are more advanced. You should try this first without weight to get the technique and then try to progress to 5-10 pound dumbbells in each hand. Begin in standing with the legs slightly more than shoulder width apart. Your hands and weights will slide along your thighs while you drop slowly toward the ground over 2-3 seconds. The trunk will need to lean forward slightly from the hips at the same time. Once your hands have gotten to the middle shins, return to the starting point over 2-3 seconds. Try 10-20 repetitions.

None of this information is intended to be medical advice. Always consult a qualified medical professional before beginning any changes in your typical activity level. Information provided is suggested for healthy, active individuals.

Let me know if you have any questions about preparing your body for exercise at mountainridgept@gmail.com.

What is dry needling?

Trigger point dry needling, or dry needling for short, is a manual therapy technique used to increase motion, decrease overall muscle tension, and break up the painful “knots” that often form within muscles. It is known as dry needling because there is nothing injected.

I discussed how muscles often generate pain in this previous post. This type of pain is frequently overlooked. 

Dry needling the low back. Image courtesy of Corridor Magazine, 2014

Dry needling the low back. Image courtesy of Corridor Magazine, 2014

Why use dry needling?

Those knotted areas are known as “myofascial trigger points.” They are often irritable and chemically different than a normal section of muscle. One type of trigger point, the active trigger point, is often the root cause of pain. Not only will the knotted area often be painful, there can be pain very far away from the actual trigger point. This is known as “referred pain” and it might be the only pain a person even feels with their injury. Referred pain can be present just a couple inches from the source but as much as multiple feet away. For instance, the gluteus minimus muscle that is deep at the side of each hip is approximately 3-4 inches in length. It can cause pain all the way down the outside of the leg to the ankle and will trick some people into thinking they have a sciatic nerve problem. Trigger points in the rotator cuff muscles of the shoulder frequently cause pain in the arm, forearm and even the hand. They can mimic a pinched nerve in the neck.

What does dry needling feel like?

There are multiple techniques that can be used when performing dry needling. A simple technique would involve placing the needle within the tightened muscle area and letting it rest there briefly. This is very easily tolerated and feels like a pressure, but it can cause a mild aching sensation in the most irritable trigger points. Another technique involves using the needle to get the muscle to contract. Again, there’s usually a sense of pressure but the aching can be stronger. The contractions themselves are more uncomfortable but are well worth the result. This is because it is common for someone to have their pain stop or nearly stop after a single session of correctly applied dry needling. Their motion is very often improved too.

What types of injuries benefit from dry needling?

Several things tend to form troublesome active trigger points. Overuse of a muscle - simply doing too much, too soon -  is a common factor. This could occur with an athlete that increases their training to quickly. A muscle that has decreased strength but is placed under a high demand will also often have trigger points. This often occurs with our shoulder’s rotator cuff muscles. They usually aren’t as strong as they should be and when we suddenly decide to clean out the garage the trigger point pain starts afterward. Trauma that suddenly strains a muscle can also be a cause of active trigger points. The low back muscles have this issue frequently, especially as repeated injuries have occurred the years. Tendon injuries commonly benefit from dry needling the muscle that attaches to the injured tendon. One of the best times to use dry needling is for a neck or low back injury that is causing nerve irritation. Relaxing the deepest muscles around the spine can decrease the nerve pain.

Are there other ways to fix trigger points?

Yes and no. Some trigger points are near to the surface and can be treated with techniques like myofascial trigger point release or massage. However, some trigger points are very deep and do not respond well to these techniques because there is so much muscle and fatty tissue to get through. I tend to favor trigger point dry needling because it achieves a great result with much less time per trigger point site. I can often have a more positive impact with dry needling three sites in 90 seconds than myofascial release to a single site that takes 4-12 minutes.

Footwork Friday - Why am I developing black toenails?

Many runners develop black toenails, especially after longer runs. This is a very specific type of bruising known as a "subungual hematoma." It has often been believed that this is caused by the shoe's toe box size restricting the toes to so much that direct trauma and bruising develops. This isn't always the case, and The Gait Guys suggest that there is another cause in one of their older blog posts.

Many runners tend to curl their toes downward in an effort to grip the inner surface of their shoe. In addition to black toenails, another sign of this habit is the presence of a callus on the very tip of the toe. Curling your toes downward requires heavy use of the flexor digitorum longus and/or flexor hallucis longus muscles. Using these muscles is a way to gain stability within the shoe, but it is not a good habit. Regardless of the presence of black toenails, this should be avoided because these muscles are not built to produce larger amounts of power or engage in constant stability control.

The area under a toenail has a large blood vessel supply close to the nail bed, so bruising occurs more easily with any vessel damage. Gripping downward combined with a small forward/backward movement of the shoe causes a shearing force through the skin and fatty tissue of the toes. That repetitive pressure with this shearing force against the insole is thought to be enough trauma to disrupt the blood vessels. The solution? Don't grip the shoe with your toes.

Shorter runs usually aren't enough repetition to harm the vessels, but longer runs will. Especially as we fatigue we  rely more heavily on muscles that aren't fatigued as much during shorter runs. Trail running could cause a greater problem because the trail surfaces are unstable and the runner will more frequently seek stability by gripping with the toes. Also, there is a greater likelihood of steeper inclines and declines that will cause more sheer force of the foot against the insole.

Although there isn't existing research to back up this idea yet, it makes good sense. Next time you are running, think about what your toes are doing. If you are gripping the inside of your shoe then STOP IT!

Let me know if you have any questions at mountainridgept@gmail.com.