Are your calf muscles even fit enough to run?
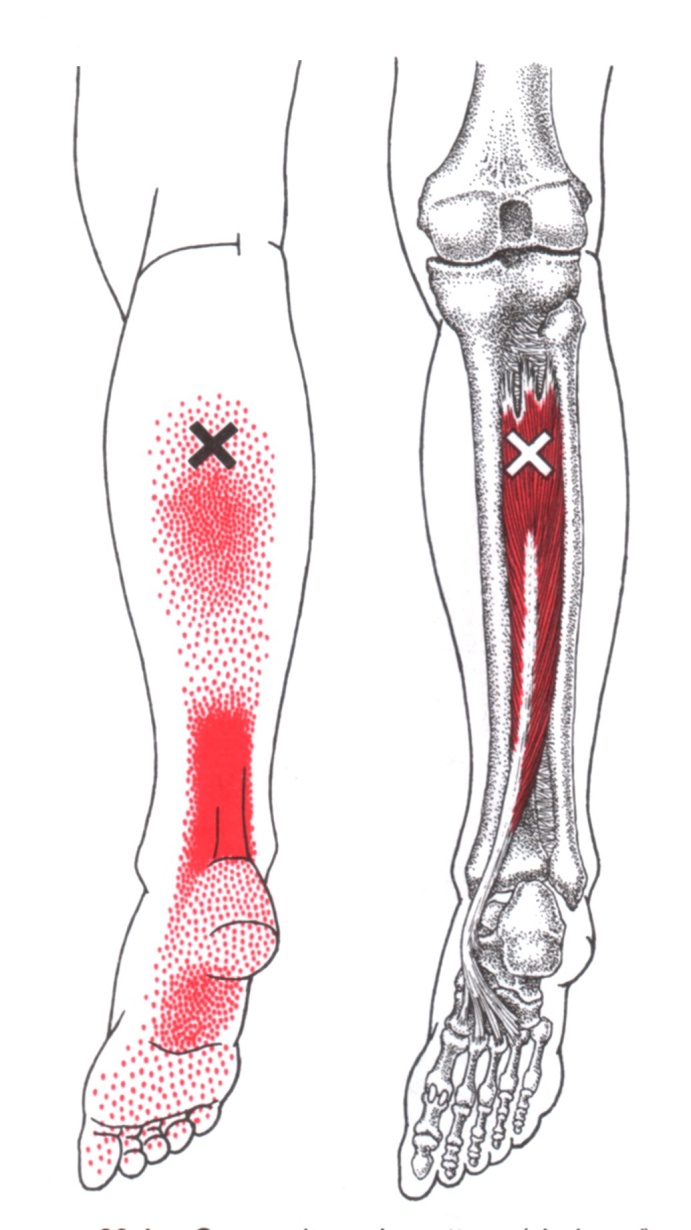
I’ve come to the conclusion that nearly everybody’s calf muscles stink. It’s partly a problem because runners tend to underestimate structural demand and think of the calf as a minor muscle group that doesn’t do much except push them a bit forward. Surely the big hip and thigh muscles are the real workers, right? Pushing is certainly some of the calf’s role during the later part of the running stride, in that brief moment before your foot leaves the ground. But slightly earlier in the stride, which is called mid-stance, as your body is moving forward over your fixed leg, the calf muscles are in full workhorse mode. 

This mid-stance timing is actually the moment when the soleus, which is the biggest calf muscle, stealthily receives its peak demands. The soleus provides a major stabilizing effect to the ankle and knee, working synergistically with the thigh’s big quadriceps to keep gravity from crushing you down like Wile E. Coyote getting a boulder dropped on his head. The calf does this by resisting the forward momentum of your shin bone, using the foot as a point of fixation to work through. (Which is great if your foot does its job correctly but that’s a story for another day.) 

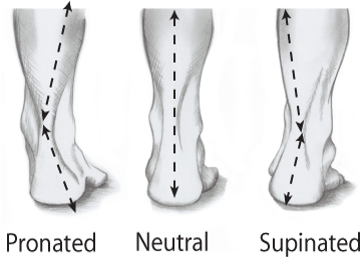
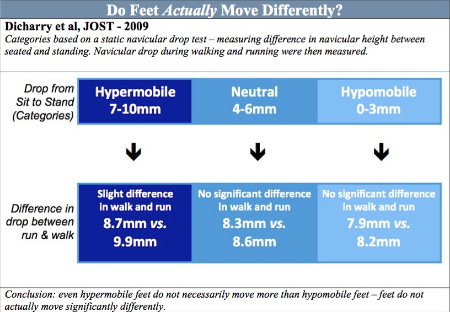
Stop worrying about the shoe marketing hype around pronation and cushioning and start worrying about getting stronger

In 2012, Dorn et al. calculated that the soleus produced an average peak of 6 times body weight force at a 7:40 min/mile pace (7.8 mph), a pace that’s arguably quicker than many recreational folks run as they trot along. By comparison, the quadriceps were producing a measly 4 times body weight in average peak force at that pace. Doesn’t seem fair that the big thigh muscles produce less force than the smaller calf muscles does it? In that same study, speeding up to 15.7 mph (3:49 min/mile pace), a full blown sprint to most of us, resulted in an average peak of more than 8 times body weight force demands in the soleus. I know what you are thinking. That you never have or never will run that fast. Me either. Because my calf muscles suck, just like yours. (Not true, I will beat you in any calf raise test that you challenge me to as long as it’s on the moon.) The real point is that your calf muscles work ridiculously hard, even at slower paces, and speeding up further elevates their demand. 

The researchers stated, “Across all running speeds, soleus, gastrocnemius and quadriceps provided roughly 75% of the total vertical support impulse needed to accelerate the body upward, with soleus contributing as much as 50%.” Notice the word vertical. The calf just wants to keep your leg tall, where your knee is bent just enough to absorb the blow of landing on the earth but not so bent that your quads work overtime or you linger on the ground too long. That’s why knee pain can relate back to less obvious factors like calf muscle function just as much, if not more so than the thigh muscles that are often blamed. And vice versa, Achilles tendon issues and calf strains can relate to poor thigh muscle function. 

Older runners, especially men over 35 who make up the masters crowd, are particularly impacted by calf and Achilles tendon injuries. One unfortunate issue with age is that the Achilles tendon reduces in stiffness. I know it sounds counterintuitive at first, but research, like that from Willy in 2019, indicates that older tendons tend to have increased compliance (stretchiness) while stiff tendons do a better job at transmitting force and are less likely to be overstretched in a way that mechanically overstrains the tissue. Would you rather drive across a suspension bridge supported by slightly forgiving but very stiff steel cables or very forgiving and less stiff rubber bands? In 2017 Mahieu et al. recognized a similar situation where weaker calf muscles were even associated with Achilles tendon injury in a group of young, male military officer cadets. 

Coupled with weakening calf muscles, an overzealous spring marathon training cycle can quickly turn to a puff of smoke. Once you’ve exceeded the structural capacity of the Achilles tendon and calf muscles, no amount of stretching is going to fix what you broke in that March moment of early season speedwork passion. As a side note, I really wish people would stop trying to stretch out tendon and muscle strain injuries. 

Even if a person hasn’t been injured and just laid low all winter to focus on slurping [insert your beer of choice], initially adding small amounts of medium to high speed strides is the safer option for a few weeks versus going out for 2 or more miles of speedwork. In order to keep the structural and neurological capacity at a level to tolerate the highest forces, I like to have athletes perform strides year round, even if they aren’t specifically doing periodized speedwork for a target event. Strides can be short, 5 to 10 second bouts before, during, or after aerobic runs but eventually can become much longer or performed uphill to encourage even more power production while reminding your tissues that they do have a very high stress job to perform. If an endurance athlete has been hurt for a while, getting consistency and volume back are the first priority with short, slow runs. Then we can start to titrate in a little speed with strides. None of these things are appropriate, though, if the calf muscle and Achilles tendon capacity are garbage after prolonged periods of missed runs. 

As for the nitty gritty of determining just how much your calf muscles stink? In 2017 Herbert-Losier et al. developed age-based normative values for the number of single leg calf raises that a person should be able to perform. These must be high quality (eg. full ankle motion with control) in order to count. You can see in the chart that the numbers are quite high. If I was still a spry young 30 year old, I should be able to complete 32 reps but now that I’m just about to hit that big 6-0 mark, my number is 23, which seems like a pretty high number to everyone whose last name isn’t Herbert-Losier. I’d estimate that fewer than half the people I see in the clinic are able to achieve their appropriate number. What’s your number? 

Data Adapted from Herbert-Losier et al. 2017

If you aren’t making the Herbert-Losier grade but aren’t currently injured, making it a point to isolate the calf for strengthening could pay off for injury prevention. There are no guarantees, because no one is immune to injury, but there is never a penalty for being stronger. For the complete beginner, strengthening doesn’t need to be complicated. A basic double leg calf raise, knees straight, from floor height could suffice for two to three times per week for two to three weeks. The goal is to feel fatigue in the calf muscle, not pain. Once that isn’t challenging, we progress to single leg straight knee calf raises and also start to do bent knee calf raises too. The soleus works hard in both positions so don’t lose any sleep about that. Once your muscles start to come out of their coma, which could still take a few more weeks, we work toward raises on steps and raises with extra weight to further increase the resistive and range of motion demands. 

Just for some perspective on how important calf strength generation is to me personally, I did single leg calf raises in straight and bent positions last week with 95# on my back for 15 repetitions in each position and of course on both legs. Sometimes I’ll do more weight, like 110-140# with reduced reps of 5-10 times. This isn’t where most runners can start and that could easily hurt many people so I’m not telling you to jump to what I do. Sometimes I go to failure, sometimes I don’t, often depending on the time of year and proximity to runs of varying stress. Other days I’ll use 20-45# as more of a light active recovery stress but that’s still too much for many beginners to start. Even still, I’ll mix in some occasional hopping and plyometric things (as long as I didn’t go really heavy) and some weighted overhead or farmer carry tip toe walking. The calf is always a point of emphasis! 

May the force be with your calf muscles. 

All information provided here is intended to be of a general educational nature and may not be specific to you and your needs. Unless you have seen me in the office, I am not your physical therapist. Even for the patients that I have seen, we would need to specifically assess these areas to have a full understanding of your individual capabilities. Always seek the guidance and advice of an appropriately licensed medical professional to address whether it is safe for you to perform any exercise like those mentioned here. 


Resources:

https://journals.biologists.com/jeb/article/215/11/1944/10883/Muscular-strategy-shift-in-human-running

https://www.sciencedirect.com/science/article/abs/pii/S1466853X23000020

https://www.researchgate.net/publication/330309803_The_Physiology_and_Biomechanics_of_the_Master_Runner

https://www.researchgate.net/publication/315515008_Updated_reliability_and_normative_values_for_the_standing_heel-rise_test_in_healthy_adults

https://www.jospt.org/doi/10.2519/jospt.2015.5885

https://journals.sagepub.com/doi/10.1177/0363546505279918?url_ver=Z39.88-2003&rfr_id=ori:rid:crossref.org&rfr_dat=cr_pub%20%200pubmed

Foot and ankle pain from posterior tibial tendon and muscle injury

Anatomy:

The posterior tibialis muscle originates on the back of the tibia, turns to tendon, and runs behind the bump at the inner ankle (the medial malleolus), and inserts into several of the bones within the arch and underside of the foot.

image courtesy aafp.org

Function:

In a standing position, when the posterior tibialis muscle contracts, the inner arch of the foot tends to rise away from the ground. In walking or running the tendon receives its biggest demand when we arrive at midstance and have all of our weight on that single foot. Some pronation during this moment is great for shock absorption but it should meet an end point. That end point is controlled partly by this muscle. This muscle plays a very important role in controlling the amount and rate of pronation occurring at the midfoot.

Causes:

Because the posterior tibial tendon takes a bend around the back of the tibia, the tendon is subjected to tensioning loads as well as compressive loads. To make matters worse, that area of tendon has a poor blood supply.

As usual, progressing intensity or volume of exercise too rapidly is a common finding in people with pain from the muscle or tendon.

There may be weakness of nearby muscles, like the gastrocnemius or soleus, resulting in greater demand on the posterior tibialis muscle.

Some people will aggravate the posterior tibialis tendon indirectly because they lack full ankle dorsiflexion range of motion. By losing motion at this one joint, the adjacent joints can be placed under additional demand. That stress is then controlled for by greater posterior tibialis muscle and tendon activity.

A change in footwear or foot orthotics could be related to onset as the demand on certain tissues could increase.

Poor balance, stability, and positional control of the hip, knee, and ankle may contribute overuse demands to the tissue.

Some people are predisposed to a more flexible and flat foot structure that will, in turn, place greater forces on the posterior tibialis tendon and muscle.

Other rare cases may have a tendon that wants to pop out of the groove that it is resting within, which is associated with a previous traumatic ankle injury.

Signs and Symptoms:

Pain typically comes on without trauma and is usually directly behind the medial malleoli if the tendon is involved but can be at the calf and bottom of the foot if the symptoms are coming more from the muscle. It is interesting to note that an aggravation of the posterior tibialis muscle can mimic an Achilles tendon pain. Take a look at the muscle referral pattern.

Decreased ankle dorsiflexion motion is common. We would measure the joint angle in the clinic, but consider it a bad sign if you can’t squat fully while keeping your heels on the ground or if you can’t lift your toes and forefoot off the ground a couple inches while keeping the shin perpendicular to the floor. Here I have used a ruler as a reference. The ruler maintains its position while I pull the foot toward my shin. Notice the size of the gap between foot and ruler in the second picture. While decreased motion could be from weakness of the anterior tibialis muscle, shortness of the calf muscles is often a contributing problem.

There may be localized tenderness and swelling just behind the medial malleolus. Especially as the condition progresses, you may notice a clicking sensation at the inner ankle region during ankle movement. This could be particularly bothersome if it is simultaneously painful.

When performing a single leg calf raise there can be pain and weakness, especially at the end point of the motion where the heel should be twisting inward a small amount, as in the picture below. You should be able to perform at least 10 repetitions of a single leg calf raise in a row, one set with the knee straight, one set with the knee bent.

Balance and stability should be sufficient enough to maintain a single leg stance with your eyes closed for 30 seconds.

If the destruction of an early tendon injury worsens, the inner arch will flatten as the tendon lengthens abnormally, causing a “flat foot deformity.” This is the reason you really want to catch an injury to the tendon early, before any long-term structural changes have occurred. If the normal structure has been modified then you will have a much longer road to recovery.

Other possible or related problems:

Pain at the inner ankle and lower leg can also be caused by a few other issues. This is where seeing a trained professional helps to rule out these other problems. If you are experiencing severe pain, numbness, tingling, pins and needles, general calf swelling and tightness then definitely don’t try to self-treat.

  • Ankle sprain

  • Blood clots in the lower leg

  • Sciatic nerve compression and irritation

  • Lumbar nerve compression and irritation

  • Tibial nerve compression and irritation

  • Sacroiliac joint alignment/stability problems

  • Hip region muscle trigger points/muscle tissue dysfunction

  • Flexor digitorum longus tendinopathy/trigger points/muscle tissue dysfunction

  • Flexor hallucis longus tendinopathy/trigger points/muscle tissue dysfunction

  • Abductor hallucis trigger points/muscle tissue dysfunction

  • Loss of hip mobility from decreased muscle flexibility or hip joint problems

  • Fracture or stress fracture

  • Tarsal tunnel syndrome

Treatment:

General treatment goals are going to consist of some combination of the following:

  • Decreasing pain

  • Increasing lost motion

  • Increasing stability and balance

  • Increasing muscle and tendon endurance

  • Increasing muscle and tendon strength

  • Resolving any abnormal movement patterns

  • Preventing recurrence

Short-term rest, ice, and NSAIDs are generally appropriate in healthy people for immediate care of a new injury to decrease pain. I am always going to emphasize that it is important to determine why the injury occurred in the first place as these methods do nothing to address the real causative factors.

Supporting the arch of the foot during the stance phase of foot strike can be helpful in decreasing load on the posterior tibialis temporarily. This can be achieved with taping, temporary or permanent foot orthotics, and footwear modifications. You should not become reliant upon these devices to keep your deficits at bay forever, though.

Strengthening the posterior tibialis muscle and tendon can be a beneficial method to increase tissue integrity. The most common strengthening method for a moderately calm tendon is a single leg calf raise performed with the knee straight and the knee bent. If that is too painful, the individual can perform these with double leg support or perform ankle inversion with a cuff weight or band until the calf raise can be performed with moderate or no pain. When strengthening tendon, the current research indicates that it is acceptable to cause mild discomfort in the area of tendon injury but you would not want to push the tendon so far that it remains painful for hours or worsens the following day. In many people holding the topmost portion of the calf raise for 15-30 seconds, known as an isometric, can help decrease pain.

There is no substitute for having full ankle range of motion. If ankle motion is lost, you may need to work on a combination of stretching, joint mobilization, and other soft tissue work to regain mobility. Soft tissue techniques are of benefit to improve any excess muscle tissue tone and gain length. This includes foam rolling, massage stick rolling, massage, myofascial release, and dry needling.

More aggressive treatment can include the use of a walking boot for immobilization and corticosteroid injections. These injections will coincide with a risk of tendon rupture, however, and should be avoided if possible. Another type of injection is PRP (platelet rich plasma). Some physicians will provide patients with nitroglycerin patches to improve local blood supply to the tendon. Surgical intervention is the last thing you want but may be particularly necessary if the tendon has remained inflamed for such a long period that it cannot glide smoothly in its sheath or has split longitudinally. A newer minimally invasive procedure to help chronic tendon injuries is called Tenex.

Please share this article with your running friends! To receive updates as each blog comes out, complete the form below. And if you have any questions, please email me at derek@mountainridgept.com.

Tips for achieving a perfect shoe fit, Part 2

Here are a few more tips to consider when looking for your next pair of athletic or running shoes.

  1. Always take a potential new shoe for a several-minute test run. You wouldn’t marry someone without dating, would you? Walking mechanics are not running mechanics. Jogging in place doesn’t count. Use the shoe like you plan to use it.
  2. Try to fit your new shoes at the end of the day to account for swelling. It’s even better if you have already gone for a run. Just find some clean socks first.
  3. Feel around the inside of the shoe for areas of prominent stitching or materials that could become blister-producing sites.
  4. Check for manufacturing flaws. The shoes should be symmetric in construction of their uppers and soles.
  5. A wide and appropriately tall toe box can be a lifesaver. Everyone thinks of the foot as having a single arch but we actually have three arches. One of those arches runs through the forefoot at the ends of the metatarsal bones. Scrunch those metatarsals together in a narrow shoe and that arch doesn’t function appropriately for stability, shock absorption, or propulsion. You also run the risk of compressing the nerves that are between the metatarsals.
  6. There hasn’t been any convincing research to indicate that the various types of shoes (cushioning, stability, motion control) can decrease injury risk. Which is why you need to emphasize finding a shoe that feels good more than any other goal.
  7. Realize that shoes are not an appropriate fix for lost motion of the ankle and big toe. If you keep acquiring the same injuries regardless of shoe choice, the problem isn’t the shoes. You need to have a trained expert in movement analyze your strength and motion. Let’s say your lower leg muscle group has shortened over a series of years and you switched to a zero drop shoe because it was trendy. That might be a little dangerous if you don’t allow for a several-month-long adaptation period. It would be safer to transition from a shoe with a thicker heel height to less heel height and then to zero drop.
  8. The heel cup should not allow the heel to slide side to side or up and down once the shoe is laced snugly.
  9. Don’t forget about the footwear you use during the rest of the day. Your body will adapt to the positions it stays in the most. Which means using a thick heeled shoe during the day only to switch to a zero drop shoe for a 45-minute workout is a sudden and severe change.
  10. Use multiple types of shoes in training. This helps vary the demands placed on your body and may even help prevent overuse injuries that come from repeatedly working in the same range of motion.
  11. More cushioning is not always better. Shoe manufacturers love creating trends because trends equal money. Now that we have passed the minimalism trend, it’s onward to maximalism. Here’s the thing with those super cushiony shoes: more cushioning means you will hit the ground harder. Our bodies are always trying to seek a sense of stability and in order to obtain it, your foot will try to plow right through a thicker layer of foam. And the more foam, the lazier your gait can become. Muscles, tendons, and proper technique should provide most of the impact absorption.

Tips for achieving a perfect shoe fit, Part 1

Have you felt the stress that arises when a shoe company stops making your favorite shoe? Like car manufacturers, shoe companies have a tendency to constantly tweak things, even when they don’t need to be tweaked. In an effort to look a little cooler, or supposedly function better, shoe construction is altered from one year to the next, forcing you to chase an ever-changing ideal. Here are a few points to consider when looking for your next pair.

  1. First and foremost, the goal is to find a shoe that is comfortable. Nigg et al. suggested in a 2015 article that we would do best to select a shoe that does not interfere with the way that our foot prefers to move most naturally.

  2. Begin to break in a new pair when one pair is about halfway worn out. I like to use the newer shoe for longer runs and the older shoe for shorter runs or nasty weather. Most shoes are going to be very worn out by 400-500 miles. However, permanent changes in the cushioning material are evident within just 200 miles. Newer or injury-prone runners may not be able to use a shoe as long as an experienced runner or one that is less injury prone.

  3. Try a ton of different models and brands when deciding on new shoes. The concept of using inner arch height as the indicator of whether you need a cushioned, stability, or motion control shoe is very controversial in the research. Sure, if you traditionally run in a certain shoe type and have no problems, then keep on with the same pattern. If whatever shoe you use seems to never be comfortable, feels too stiff, not stiff enough, too flat, or too high, then check out the other options that are available.

  4. “Pronation” is not a bad thing. Everyone’s foot should pronate for the purpose of shock absorption. Individuals having lower inner arch heights pronate similar amounts to individuals with higher inner arch heights. Do not feel obligated to “stop” pronation with foot orthotics or stiffer shoes. That concept went out in the 1990s. Let your foot do the job that it was designed to do.

  5. Remove the footbed liner of the shoe and place your foot on the liner. Ensure that your foot is fully surrounded within the perimeter of the liner.

  6. Before you put the shoe on, try this “break test.” With two hands at each end of the shoe, compress the heel and toe of the shoe toward each other. The shoe should flex in the region of the forefoot. The forefoot will often have a cut in the sole that aligns closely to the joint at the base of your big toe and ball of the forefoot, which allows the joints to extend easily at that point. You want that big toe joint to align with the hinge point.

  7. Still with the shoe off, with two hands, one on each end of the shoe, twist the shoe like you are trying to wring water out of a rag. There should be some motion allowed here. A shoe that barely twists at the front is not going to move well with your forefoot. At the same time, you want some, but not a ton of motion at the midfoot.

  8. Sit the shoes side by side on a flat surface and compare how they rest on the surface. Check them from behind and from the front. They should be mirror images of each other. If one seems to be tilted differently than another, find a different pair. The heel cup should be centered over the sole.

  9. Check the fit with your usual foot orthotic devices in place. Do keep in mind that most foot orthotic devices have an additive effective to the stiffness of the shoe. In other words, a stiff orthotic within a motion control shoe is heading toward overkill. You could use the motion control shoe independently or you may develop a similar stiffness from pairing the foot orthotic with a stability or cushioning shoe.

  10. Over-the-counter orthotic inserts are not a necessity. I’m a big fan of letting the foot do the work it was designed to do, if at all possible. A lower arch height is not an absolute indicator that you need a foot orthotic. Imagine that foot structure is on a bell curve of normal where those on the tail ends of the curve have a foot shape that would benefit from the additional help of a foot orthotic. And inserts may raise the heel more than the forefoot, adding another layer of material that will contribute to changing calf muscle demand and altering ankle position. That shoe with an original 8 mm drop ends up becoming a 12 mm drop with that “arch support.”

  11. Fit your shoes to allow for space of the longest toe and longest foot. Some folks have such a difference of foot length that they should actually buy two different sized shoes. Aim for 1/2-inch between the end of the toe and the end of the toe box.

  12. Wear your typical socks during the fit session. (These better not be cotton or we really need to have a talk).

Please let me know if you have any questions at derek@mountainridgept.com. Thank you for reading!

Does foot pronation increase risk of injury?

There is a misconception that certain structural features of the body are directly related to injuries. For years, people with lower arches were referred to as “pronators” and those with even flatter feet were “overpronators” or “hyperpronators.” They were all thought to have more injuries, and a portion of the shoe industry has really kept that mentality alive. The other two general foot types, neutral and supinated, were the supposed ideal.

Image Courtesy http://www.mikevarneyphysio.co.uk/wp-content/uploads/foot_pronation_supination.png

If you watched the pronator group walk, they might not appear to maintain their arch height very well. But is that always a problem? In the people labeled as pronators there are often joint structure differences that allow more inward collapse of the ankle and foot. In the supinator group there are joint differences that would keep the ankle and foot raised upward. Regardless of foot type, some level of pronation is a normal movement because it allows for shock absorption as the leg is loaded. A certain amount of supination is also normal because it allows for a rigid push off.

We begin our childhood with a lower inner arch height, largely due to a lack of bony structure, and this results in a pliable foot. With normal growth, as the foot bones develop, the inner arch tends to rise and the bones of the leg also change their orientation a bit. In some people the arch really doesn’t increase its height much with growth. And even if it does, in adulthood there can be contributing changes that would affect foot and ankle position:

  • degenerative or use dependent joint changes at front of the foot, the middle of the foot, or the rear of the foot  

  • lower leg muscle shortening

  • weak, inhibited, or injured lower leg muscles or tendons (commonly the posterior tibialis)

  • general hypermobility throughout many of the body’s joints

  • tibia and femur bone structure (twisting, length discrepancy)

The concern is that these changes are also able to affect the movement of the knee, the hip and then even the pelvis and back. We all have a certain acceptable range of motion within each of these areas. If the changes in the foot allow the knee or hip to operate just on the edge of their tolerated position of use then, conceivably, you might have an increase in risk for knee or hip injury.

In actuality, foot structure may be more related to the type of injuries acquired than frequency of injury.

  • According to a 2001 research article in Clinical Biomechanics, higher arched runners developed injuries most often on the lateral side of the leg and had more ankle and bony injuries. Their lower arched counterparts had more knee and medial lower leg injuries.

  • A 2005 research article in the Journal of the American Podiatric Medical Association indicated that triathletes with a more rigid, high arch were at a higher risk of injury compared to neutral and pronated foot types.

  • More recently, in 2014, a meta-analysis in the Journal of Ankle and Foot Research indicated a very slight increase in risk of overall injury rate with the more pronated foot type being related to increased risk of kneecap pain and medial tibial stress syndrome (a.k.a. one of the types of shin splints.)

As you can see, the research is conflicting. The rate of injury is similar between athletes with all foot types. Perhaps we would have different results if we broke the common groups (pronator, neutral, supinator) down into subgroups based upon strike patterns (heel, midfoot, forefoot) to account for variations in demand.

My concern is that many of these studies assess the foot arch height while standing still. Unfortunately, this does not mimic how you use the foot in activity. Someone with a pronated foot structure while standing may not even touch their heel to the ground with running. Is it really going to be effective to put them in a motion control or stability shoe designed with a heel striker in mind?

A 2009 study by J. Dicharry demonstrated that while running the total motion of the navicular bone in the arch isn’t drastically different regardless of foot type. They called the pronators the hypermobile group in this case. Even if the arch of a pronated foot is at a lower position in standing, it’s total amount of motion is only slightly increased from a neutral or supinated foot while running. Neutral and supinated feet were 0.3 mm different between walking and running. Pronated feet were 1.2 mm different from walk to run. 

Should you be concerned with such minor differences and trying to use external devices like shoes to accommodate for them? The first step is to determine whether the pronation that is occurring is structural or a compensation. If forced to compensate, as in the case of decreased calf muscle length, you may need to focus on increasing mobility where it has been lost, like at the ankle joint, by elongating the calf muscles. Forcing mobility where it has already reached an excessive level in the midfoot by neglecting the calf length is not going to be helpful.

Our bodies are very good at adapting to gradually applied stresses, so a person with a more flexible, lower arch should be able to safely progress their activity just like anyone else. The research would suggest addressing the tissues that are the most likely to be injured with each foot type.

For instance, someone with a higher arch could focus on single leg balance and strengthening of the outer lower leg muscles. Those with a lower arch could focus on increasing strength of the inner lower leg muscles. I suggest we should focus on keeping both sides of the lower leg as strong as possible without one side becoming more dominant.

An often overlooked factor is inner foot muscle strength. Several of those muscles are meant to stabilize the arches of the foot, so it would be no surprise to me that decreased inner arch height can be associated with decreased muscle strength. But it’s not always a 1:1 relationship. Little research exists on this because it’s difficult to measure intrinsic foot muscle strength. Look for my blog article on intrinsic foot muscle strengthening soon.

Final thoughts:

  • Progress running intensity and duration in a safe manner using the 10% rule.

  • Keep the calf muscles loose to prevent ankle motion loss with a combination of rolling, massage, dry needling, and maybe stretching.

  • Strengthen the muscles that take the ankle and foot in all directions.

  • Strengthen the intrinsic foot muscles.

  • A pronated foot type does not necessarily require a bulky, stiff shoe and orthotics.

  • A pronated foot type is not going to be an immediate cause of injury, there are other factors to consider.

  • Don’t spend too much time worrying about your foot type because anatomical variation is normal.

  • Let your feet work how they were intended.

Geek out:

http://www.ncbi.nlm.nih.gov/pubmed/19648718

http://www.japmaonline.org/doi/abs/10.7547/0950235

http://www.clinbiomech.com/article/S0268-0033(01)00005-5/pdf

http://jfootankleres.biomedcentral.com/articles/10.1186/s13047-014-0055-4

http://journals.lww.com/cjsportsmed/Abstract/2001/01000/The_Role_of_Impact_Forces_and_Foot_Pronation__A.2.aspx


Please let me know if you have any questions at derek@mountainridgept.com and feel free to share this article via the share button below.

Footwork Friday - Why am I developing black toenails?

Many runners develop black toenails, especially after longer runs. This is a very specific type of bruising known as a "subungual hematoma." It has often been believed that this is caused by the shoe's toe box size restricting the toes to so much that direct trauma and bruising develops. This isn't always the case, and The Gait Guys suggest that there is another cause in one of their older blog posts.

Many runners tend to curl their toes downward in an effort to grip the inner surface of their shoe. In addition to black toenails, another sign of this habit is the presence of a callus on the very tip of the toe. Curling your toes downward requires heavy use of the flexor digitorum longus and/or flexor hallucis longus muscles. Using these muscles is a way to gain stability within the shoe, but it is not a good habit. Regardless of the presence of black toenails, this should be avoided because these muscles are not built to produce larger amounts of power or engage in constant stability control.

The area under a toenail has a large blood vessel supply close to the nail bed, so bruising occurs more easily with any vessel damage. Gripping downward combined with a small forward/backward movement of the shoe causes a shearing force through the skin and fatty tissue of the toes. That repetitive pressure with this shearing force against the insole is thought to be enough trauma to disrupt the blood vessels. The solution? Don't grip the shoe with your toes.

Shorter runs usually aren't enough repetition to harm the vessels, but longer runs will. Especially as we fatigue we  rely more heavily on muscles that aren't fatigued as much during shorter runs. Trail running could cause a greater problem because the trail surfaces are unstable and the runner will more frequently seek stability by gripping with the toes. Also, there is a greater likelihood of steeper inclines and declines that will cause more sheer force of the foot against the insole.

Although there isn't existing research to back up this idea yet, it makes good sense. Next time you are running, think about what your toes are doing. If you are gripping the inside of your shoe then STOP IT!

Let me know if you have any questions at mountainridgept@gmail.com. 

Achilles tendonitis: Early self-treatment and when it's gone too far, Part 2

In part 1 you learned the basics of treating a recent onset of Achilles tendonitis. Much of that should emphasize the soft tissue mobility of the lower leg (which is more than just stretching). For those of you that don't have a grasp on how to be working on the soft tissue of your lower leg with foam rolling, self-massage and other techniques, check out my post and video here

If reduction of mileage, over-the-counter anti-inflammatories and ice don't help knock out the pain then it is very likely that you are no longer dealing with an inflammatory condition. The tendon area could feel increasingly stiff and tight after you have sat for a while and then place weight on the leg or when you first put weight on the leg in the morning after sleeping. When that initial inflammatory stage has started to pass in 2-4 weeks and you still haven’t gotten anywhere because you continue to have pain, then consider professional guidance. This is especially true if the injury keeps occurring or you notice the Achilles tendon itself remains swollen or is thickening in size or is forming hard nodules. Another issue to note here is that pain where the Achilles tendon attaches to your heel will often be harder to treat and slower to resolve. Indications for seeking professional help immediately would be: 

  • any indication of bruising in the heel or Achilles area

  • inability to bear enough weight to walk normally with that leg

  • you felt a "popping" sensation at a single moment of injury

  • you can't make your calf contract firmly to point your toes downward or can't perform a calf raise

If you feel any of these situations apply to you then you need more immediate attention with a medical professional. 

There are several things to consider with advanced examination and treatment. First being the findings of neurological and musculoskeletal exam. Second being running gait evaluation results. Third being training errors, footwear, terrain and so on. 

If you recently changed your running technique so that you land forefoot first and push off heavily from your forefoot then you might want to reconsider jumping into that abrupt change. If you are an aging runner this could be especially risky. There are often balance and stability deficits that result in poor control of the entire leg, which we will discuss in a future blog post. I would also suggest strengthening your hips. It is very common for me to see knee and ankle injuries on the same side as an athlete's weaker hip muscles. This feeds back into the stability control problem. Your movement needs to be precise.

Any care needs to consider the phase of healing that the tendon is in. The illustration below summarizes this nicely. Ultimately, we are interested in the Achilles having an appropriate level of collagen (scar) deposits and remodeling those deposits to support the injured area. That sounds simple but if you look at the time frame along the bottom axis of the graph you will notice that collagen is being placed as early as 3 days but needs to continue for weeks to months afterwards. Tendon healing, unfortunately, tends to lean toward weeks and months, which is why you shouldn't delay proper care and ignore the pain. This doesn't mean you won't be able to exercise during that time. 

PHases of injury healing, From Daly TJ: The repair phase of wound Healing, re-epitheliazation and contraction. In  Kloth CL, McCulloch JM, Feedar JA (eds.): Wound healing: alternatives in management. philadelphia, FA davis, 1990, p 15. 

PHases of injury healing, From Daly TJ: The repair phase of wound Healing, re-epitheliazation and contraction. In  Kloth CL, McCulloch JM, Feedar JA (eds.): Wound healing: alternatives in management. philadelphia, FA davis, 1990, p 15. 

Tendonitis and a tendinosis are both treatable with some of these techniques in common and some techniques being very different. Tendinosis, the more degenerative condition, requires heavy commitment to a home exercise program to perform strengthening exercises as well as manual therapy in the clinic to decrease scar adhesions, increase ankle motion and maybe even provoke an inflammatory response in the tendon area again. The strengthening must be performed frequently enough and with enough difficulty to force your tendon to adapt, similar to your normal exercise routine. The trick is knowing how much pain to push through. Both injuries can be treated successfully. 

Mid-stance of running gait

Mid-stance of running gait

The good thing is the human body is adaptable. The bad thing is it takes time and effort. Depending on where you area in the injury process, you might be able to run again sooner with some simple running gait changes to decrease the Achilles tendon load, proper strengthening, balance training, decreased training stress and properly addressing calf muscle tissue integrity. 

To receive updates as each blog comes out, complete the form below. Email your questions to derek@mountainridgept.com. We'd like to get you back to working out and running as soon as we can. Please share this article with your running friends! 

Footwork Friday - Basic Lateral Agility Drills

Welcome to Footwork Friday where we introduce agility drills, strengthening, and muscle care techniques for the athlete who understands how important their feet and legs are in carrying them through to the next step in their active lifestyle. 

Runners and many other athletes don't get enough lateral movement in their training. This is why we tend to weaken in side-to-side movements and we also tend to become injured because of instabilities side-to-side. Even in an uninjured state, learning to stabilize the body to prevent lateral movement can be very useful to move quickly and safely across unstable surfaces like rocks, roots, grass and mud. As far as pure performance is concerned, increased lateral movement is an energy waste when you are trying to move quickly forward.

The agility efforts do not need to be long. The technique just needs to be as accurate as possible. Like I've shown in the videos, a 10-15 yard section is plenty long enough. Go through each drill 2-4 times. For any agility drill I recommend fully recovering between efforts because you are ultimately trying to train your nervous system, not your heart or lungs.

Initially, for the first drill, focus on keeping the contact light and not crossing one leg over the other. Strive for keeping the body tall. As you learn what it feels like to "stick" the outer leg, try to make sure your knee is staying straight over top of your foot. In other words, the knee doesn't bow inward or outward. It does need to be bent for a soft landing though. This is commonly done with an agility ladder but I prefer to do them in the middle of a short and easy run or a moderate distance run to keep the right muscles awake. As you get faster you can focus on lowering your body closer to the ground. 

For the second drill focus again on light and quick contact with the ground. Emphasize keeping your stance wide and pumping the arms directly forward and backward. I like to do this in the middle of my runs as well. Just be careful because it will skyrocket your heart rate and effort levels very quickly.

Have fun and let me know if you have any questions at mountainridgept@gmail.com

Fixing overuse running injuries with Heather Parks

This week I had the pleasure of working with local runner Heather Parks on addressing some of her long-term running injuries. These old injuries include Achilles tendonitis, piriformis syndrome, and multiple ankle sprains along with current foot pain. She has been distance running since she was a young teenager and like many of us, has had some of her injuries show up multiple times. To compensate, she has done what many runners might do: try out different kinds of shoes, add an over-the-counter foot orthotic, ice the injured area and start training the core muscles more. Oh, and ignore some of the pain. Runners are great at ignoring pain and we consciously or unconsciously change our techniques sometimes. 

These adjuncts have given her some success, but neglecting proper treatment over time would lead her back to the same types of pain. Recurring themes are an indicator that something is mechanically deficient.

Now Heather is no slouch when it comes to running. She’s run in the US Olympic Marathon Trials. So she’s put big demands on her body in the past, responded well and come out on the other side with greater fitness. Our bodies become really good at improving efficiency within the constraints that they are given. If you learn to run fast with a decreased amount of hip motion, for example, then you have accomplished your goal of running fast but with less than ideal biomechanics. But how long can you keep up this high intensity and high mileage before something in the body begins to wear down prematurely because of the restricted hip motion? The same goes for restricted ankle motion. Someone that is in spectacular physical condition, like Heather, is going to be more resilient. But with time, mileage, and previous injuries, the little mechanical flaws start to add up and pain starts to creep in.

Increasing her intensity with track workouts and turning on the tight corners of an indoor track would stir some of these things up predictably. Running track turns are very repetitive when performed in the same direction and force us into a slight asymmetry with every step. Wearing racing flats would increase her pain as well. This is likely related to the lowered heel height of the shoe that places more load on the calf and Achilles tendon.  Despite decreasing her mileage earlier this week, Heather continued to have right heel pain multiple days later. She had a hunch her history of calf and Achilles pain could be related. And it is. But we’ll get to that later.

First, let’s look at her examination findings. Initially, I noticed a significant right calf muscle atrophy (smaller muscle). When instructed to do a calf raise onto her forefoot Heather did 20 repetitions on her left side but only managed 10 on the right side - and the technique was lacking. She demonstrated weakness of both hamstrings groups (but worse on the right). Her right gluteus medius muscle at the hip was a grade weaker than the left side. She was unable to squat fully to the ground while keeping her entire foot in contact because of the shortness in her lower leg muscles. She was also unable to squat fully because of her tendency to be reliant on her quadriceps muscles and is unaware of how to to use her hip muscles for strength and stability. When squatting on a single leg her right knee tended to drift toward the midline of her body, which is a sign of poor hip control, again linking back to the weak gluteal muscles. Her single leg balance with her eyes closed was better than many people at 16 seconds on the right leg and 12 seconds on the left leg but I’d rather both of them be at least 30 seconds. Heather could hold a side plank on her right side for 45 seconds but could manage only 25 seconds for the left side.

Right calf with decreased muscle mass

Right calf with decreased muscle mass

Watching Heather run on the treadmill, it was noticeable that she occasionally had her right leg land closer to her body’s midline instead of directly under her hip joint. I never saw the left leg do this. This was not a huge amount by any means, about ¾” to 1” of deviation. Less experienced and weaker runners commonly land with both of their feet heading toward midline, often because of decreased hip muscle strength or activation issues. Also, it was apparent that her right ankle was rarely moving through its full available range of motion and this would cause her to prematurely lift her heel from the ground during the running stride and lead to a rocking over the base of the big toe. It also caused the right heel to whip out just before her foot lifted from the treadmill. By relying on the foot to do the work of the ankle she has demanded more from the muscles and tissue within the bottom of the foot.

Left heel remains in alignment

Left heel remains in alignment

Right heel whipping laterally

Right heel whipping laterally

In general, many of these are meaningful asymmetries, or imbalances. Distance runners don’t do well with asymmetries because we go through thousands of repetitions and then fatigue later in a run makes any flaw even more catastrophic. Heather’s physical examination correlates well with her running technique. She uses what strength and motion she has to perform the task of running. Can we fix a couple things? Yes!

Afterwards, I used trigger point dry needling on her right foot to help with the tenderness and pain there. I also used the needling at her lower leg to loosen some of the calf muscles. This did cause soreness at her calf but upon standing, her heel pain was gone. I then taught her a handful of exercises to reinforce the motion increases at the ankle and teach her how to allow the ankle’s available motion. This ankle motion will not translate directly into her running right away and will first take work in her home exercise program. She also started working on the “penguin walk” activation exercise to help her learn to use the gluteus medius more on the right side with running. Heather was able to return to running at a high level on the same day with a 6 mile tempo run at 6:30 per mile pace with minimal pain.

We will meet again in the next couple weeks to see how she is progressing with her exercises and spend more time on the manual therapy required to increase her ankle motion and decrease stress on the foot and lower leg.

Footwork Friday - Foot muscle rolling

Welcome to Footwork Friday where we will be introducing agility drills, strengthening, and muscle care techniques for the athlete who understands how important their feet are in carrying them through to the next step in their active lifestyle. While you are beating the heck out of your feet out there, think about the health of your feet every so often. Our feet can be very resilient, but when they start to go south then bad mechanics tend to snow ball, leading to other leg and hip injuries. Take care of them before they head south. 

Today's topic is simply about rolling the muscles of the feet. It seems simple but I want you to do it correctly. Sure, it's fine if you sit in a chair and roll a golf ball up and down the length of the bottom of the foot. Many people do this and that's great and easy to do. I just want you to realize that you may be neglecting two of the most important muscles: abductor hallucis and flexor hallucis brevis. This is because they are on the inside of the foot. And they do a ton of work stabilizing your inner arch. 

To get to them you have to pick up your foot and roll the inside of the arch and heel with a massage stick, golf ball, dowel rod, etc. I've colored the abductor hallucis muscle in red and flexor hallucis brevis muscle in purple in the photo below. Don't roll onto the bones.

Abductor hallucis (red), flexor hallucis brevis (purple)

Abductor hallucis (red), flexor hallucis brevis (purple)

If you want a primer on my version of proper rolling altogether, see my earlier post here

As an aside, if you are having pain more toward this inner side on the bottom of your foot then there's a good chance it can come from these muscles, not the plantar fascia that is often blamed.